Patty Moreland Photo Foundations
Class 3: Reviewing Focus and Depth of Field
Overview: We beat the rain and did a Depth of Field exercise with a fish and a blue bottle, and worked on connecting focusing and focal points with depth of field.
This was a review class, putting a lot of what we’ve worked on together. Keep practicing and reach out if you have any questions! Don’t forget about the simulators linked below and the exercises we’ve worked on and talked about!
Class 2: review and Depth of Field
Overview: In class, we reviewed how to change settings and talked about depth of field. We looked at some simulators to put it all together.
Depth of Field
Depth of field adds another artistic decision you can make. Depth of field is a plane that can be as thin as a sheet of paper or huge. Depth of field refers to ‘acceptable level of focus’ and is a function of your aperture (f/stop), focal length and distance to your subject.
You can play around with Depth of Field by calculating it here or using this simulator.
When your depth of field is very shallow, you’ll get blur before and after your subject. When your depth of field is much deeper, more things will be in focus. You determine where your depth of field is by pointing your focal point on your subject. The blur we get in shallow depth of field is called ‘bokeh’, which is Japanese for blur.
Putting it all together
In class, I told you that there are about 6 equivalent exposure settings when you aren’t at the limits of your ISO, aperture or shutter speed. This means that you can usually make artistic choices by prioritizing your shutter speed (to freeze or blur your subject if they are moving), your aperture (to influence depth of field), and ISO (to make your sensor more sensitive to light when you need to limit light via your aperture or shutter speed). Starting with shutter speed or aperture is dependent on your subject – a stationary hut means you can use a slower shutter speed (but not too low unless you have a tripod), or an ugly background may mean you want a shallow depth of field behind your subject.
Raw vs Jpeg files
What’s the difference between saving in RAW or JPEG files? One gives you options, the other locks you in.
Think of it like bread dough.
When you shoot in RAW, you’re working with unbaked dough. You can add raisins. You can fold in chocolate chips. You can shape it into a baguette or twist it into a pretzel. The possibilities stay open because nothing’s set yet.
JPEG? That’s the finished loaf. It’s already baked. You can slice it, toast it, maybe butter it, but you can’t unbake it and add cinnamon. Those decisions are done.
What This Means for Your Photos
RAW files hold all the data your camera captures. Every bit of light, color, and detail sits there waiting for you to decide what to do with it.
You can:
– Brighten shadows without destroying detail
– Shift white balance completely
– Adjust colors without things falling apart
– Pull back overexposed areas that still have detail
JPEG files compress that data down. Your camera makes decisions about color, contrast, and sharpening, then throws away information to make the file smaller. What you see is pretty much what you get.
So Which Should You Use?
If you’re learning to edit or want maximum control, shoot RAW. You’ll need Lightroom or similar software, and the files are bigger, but you’re keeping your options open.
If you want photos ready to share straight from your camera, JPEG works fine. Just know you’re letting your camera do the baking.
The key: you can always go from RAW to JPEG. You can’t go backward. Once it’s baked, it’s baked.
Homework:
- Take a look at these simulators and change your settings so you can get a ‘good’ exposure (by getting your exposure meter to zero).
http://www.andersenimages.com/tutorials/exposure-simulator/
https://www.camerasim.com/original-camerasim
2. Try this ‘freeze the fan exercise’:
Turn on all the lights in your room for maximum brightness. Set your camera to manual mode with these starting settings: ISO 100, aperture f/5.6.
Start with a slow shutter speed like 1/30 second and take a photo of your ceiling or table fan running. The blades will be completely blurred. Now gradually increase your shutter speed – try 1/60, then 1/125, 1/250, 1/500, and keep going faster until the fan blades appear sharp and frozen in your photo.
As you increase shutter speed, your photos will get darker. When this happens, increase your ISO to maintain a good exposure. You’ll likely need to go up to ISO 800, 1600, or even higher to keep your photos properly exposed at the fastest shutter speeds. If you have larger apertures available to you (like f/4 or f/2.8), you can use them, too.
This exercise teaches you exactly how shutter speed controls motion blur and shows you the relationship between shutter speed, ISO, and exposure.
3. Practice Practice Practice!
Use these bingo sheet as a way to go find things to photograph 🙂
Resources:
Class 1: parts of the camera and changing settings
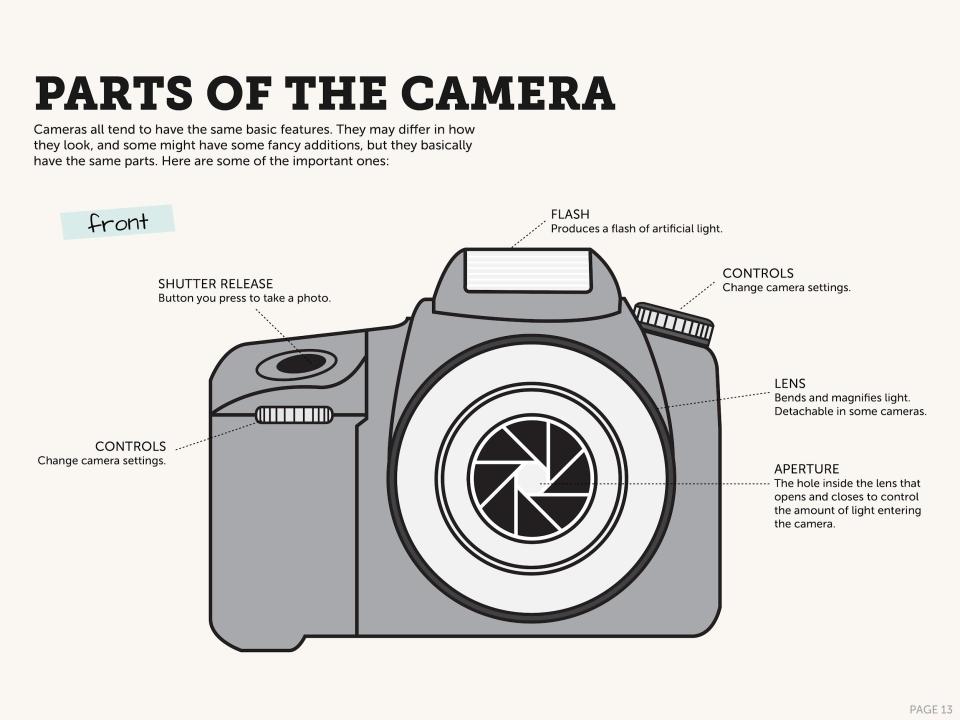
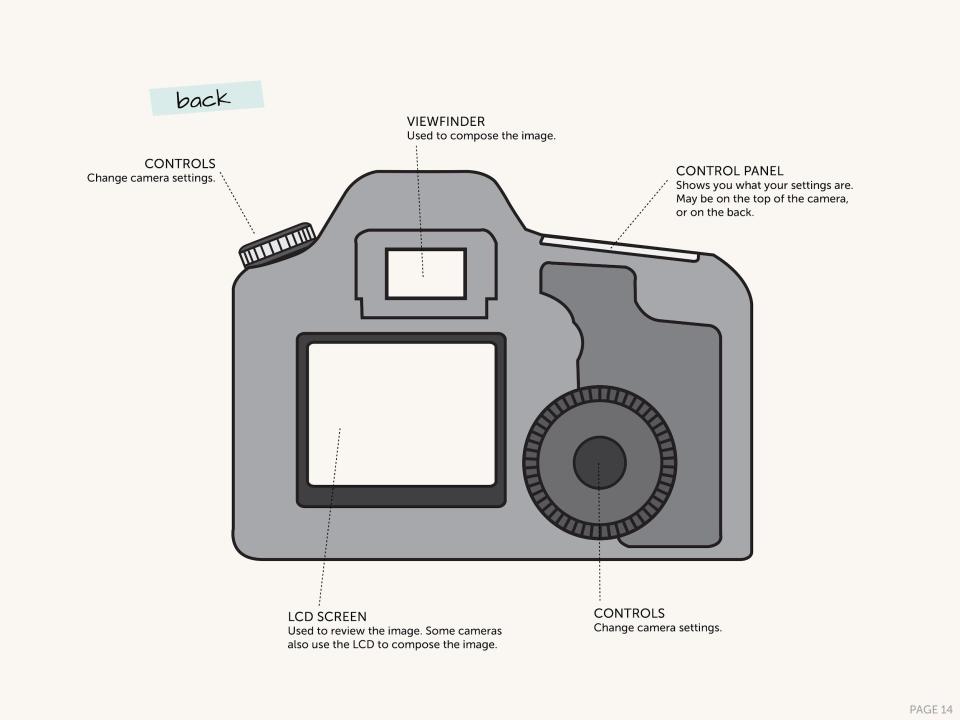
Overview: For our first meeting, you got some hands-on experience with your camera. We worked on changing ISO, aperture and shutter speed to get a good exposure. You also learned how to change your focal points.
Exposure Triangle
The exposure triangle is made up of ISO, aperture and shutter speed.
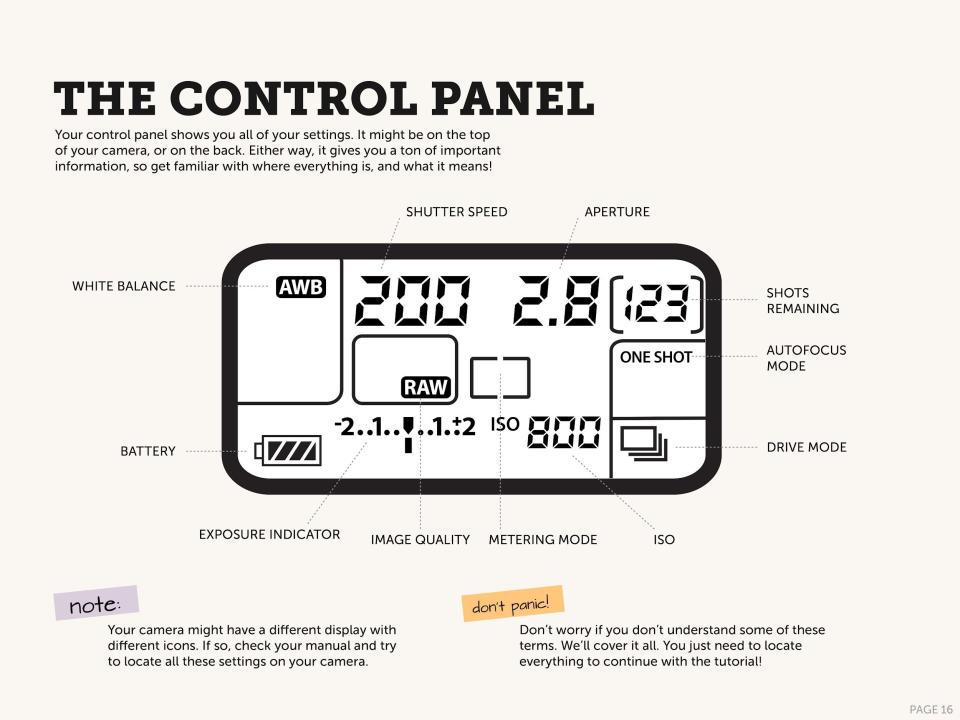
ISO refers to your camera sensor’s sensitivity to light. The numbers start at 50 or 100, and can go up as high as 252,600. High ISO can create ‘noise’ in your image, which is similar to ‘grain’ in film photography. Sensors have come a long way in recent years, so feel free to experiment with taking images at higher ISOs until you know you can’t.
Aperture/F-stop refer to the diameter of the opening on your lens that allows light to enter your camera and hit the sensor. On your LCD screen, it may be the number with a decimal point. The lower the f/stop, the wider the diameter of the aperture is (counter-intuitive!!!). The higher the f/stop, the the smaller the aperture. Aperture is a function of your lens, and the lowest aperture your lens has may be different that other lenses.
Shutter speed is how long the shutter is open to let light into your camera. Shutter speeds can be as slow as 30 seconds or as fast as 1/8000 a second. The faster the shutter speed, the faster the subject you can freeze in time.
Good exposure
A ‘good exposure’ is measured by your camera’s exposure meter at ‘0’. Your exposure meter also shows overexposed (too bright) numbers 1, 2 and 3 to the right of the zero, and underexposed on the left of the zero. Photography tries to standardize these measurements and calls them ‘stops’. Going from zero to 1 stop overexposed means your are letting double the amount of light into your camera (this is a relative measurement). Going from zero to -1 stop means you are underexposing (too dark) by halving the amount of light into your camera.
When you are looking through your camera’s view finder at your scene and half-press your shutter button, your camera evaluates the scene and tries to average it to 18% grey (which is basically a light grey). If it can’t average the scene to 18% grey, it’ll use the exposure meter to show you if it thinks your settings are letting in too much light (overexposed) or not enough light (underexposed. Then, you’ll adjust your settings accordingly.
I put ‘good exposure’ in quotes because what you think is a good exposure and what your camera thinks is a good exposure is not always the same thing. For example, I underexpose sunrise/sunset photos by 1 full stop so I can get all the great colors.
Focusing
In addition to everything else we are telling our cameras, we want to tell it where to focus. To do this, we move our focal point so it is over our subject (or their eyes, or the point of interest) so our camera knows what we think the subject is. When we half-press the shutter button, in addition to measuring the exposure of our scene, it also focuses our image on whatever our focal point covers.
Homework
For homework, please practice some of the following:
- practice changing your settings (aperture, shutter speed and ISO). Learning how to change your settings is really the must fundamental thing you need to learn this week 🙂
| ISO | Aperture (f-stop) | Shutter Speed (seconds) |
|---|---|---|
| 100 | f/2.8 | 1/1000 |
| 200 | f/4 | 1/500 |
| 400 | f/5.6 | 1/250 |
| 800 | f/8 | 1/125 |
| 1600 | f/11 | 1/60 |
| 3200 | f/16 | 1/30 |
| 6400 | f/22 | 1/15 |
| 12800 | f/2.8 | 1/8000 |
| 25600 | f/4 | 1/4000 |
| 51200 | f/5.6 | 1/2000 |
2. Practice changing your focal point. Find a scene to photograph, and practice moving your focal point to over different subjects (a flower garden with lots of flowers works great for this) so you get the feel of doing it.
3. Put it together*- find a scene and change your settings so you have a ‘good’ exposure (one where the exposure meter measures the light as at zero). Then, change your aperture only until your exposure meter measures at +1 or -1. *If this doesn’t go well, don’t get discouraged! Just practice changing your settings!
4. Look at Flickr.com. You’ll have to make an account if you don’t already have one, but you don’t need to pay for a subscription. Spend some time looking at different images – this helps train your mind’s eye, and eventually, you’ll get better at recognizing what sort of camera settings the photographer must have used.