Fall Beginning Camera
Class 4: Shutter speed, Drive Mode and recap
Overview: We took a deeper look at shutter speed, learned about drive modes. Then we recapped the exposure triangle.
Shutter speed is how long the camera’s shutter stays open during an exposure. It’s measured in seconds or fractions of a second.
How shutter speed affects exposure (brightness)
Shutter speed controls how much light reaches the sensor.
Faster shutter speed (shutter open for less time) → less light → darker image.
Slower shutter speed (shutter open longer) → more light → brighter image.
Changing shutter speed may require adjusting aperture and/or ISO to keep exposure balanced.
How shutter speed affects motion
Shutter speed controls how motion is rendered.
Fast shutter speeds freeze motion (useful for sports, active kids, fast action).
Slow shutter speeds show more motion blur because movement is recorded while the shutter is open.
Motion blur can be used intentionally for creative effects, but exposure may need rebalancing to avoid overexposure.
Stability and when to use a tripod
Slower shutter speeds increase the risk of blur from camera shake (hand movement).
Camera shake is different from intentional motion blur and is generally something to avoid.
Stabilization (tripod or similar support) is recommended at slower speeds, especially if hands are unsteady.
Drive Modes
- your camera may not have all of these. By using these, we are telling the camera how many photos to take at a time.
- Single Shot Mode
When to Use: Ideal for most types of photography, including portraits, landscapes, and still life.
How It Works: The camera takes one photo each time you press the shutter button. This mode is great for controlled environments where you have time to compose your shot. - Continuous Shooting Mode (Burst Mode)
When to Use: Perfect for action photography, such as sports, wildlife, or any fast-moving subjects.
How It Works: The camera takes multiple photos in quick succession as long as you hold down the shutter button. This increases your chances of capturing the perfect moment. - Self-Timer Mode
When to Use: Useful for group shots, self-portraits, or long exposures where you want to avoid camera shake.
How It Works: The camera delays the shutter release for a few seconds after you press the button, giving you time to get into position. - Remote Release Mode
When to Use: Ideal for situations where you need to avoid touching the camera, such as long exposures, macro photography, or wildlife photography.
How It Works: You use a remote control to trigger the shutter, minimizing the risk of camera shake. - Mirror Lock-Up Mode
When to Use: Best for long exposures or macro photography where even the slightest vibration can affect image sharpness.
How It Works: The camera locks the mirror in the up position before taking the shot, reducing internal vibrations. - Quiet Mode (Silent Shutter Mode)
When to Use: Useful in quiet environments like weddings, wildlife photography, or any situation where you need to minimize noise.
How It Works: The camera reduces the noise made by the shutter and mirror mechanisms. - Auto-Exposure Bracketing (AEB)
When to Use: Ideal for high-contrast scenes or HDR photography.
How It Works: The camera takes multiple shots at different exposure levels (e.g., one underexposed, one correctly exposed, and one overexposed) to capture a wider dynamic range.
Tips for Using Drive Modes:
Action Shots: Use Continuous Shooting Mode to capture fast-moving subjects.
Group Photos: Use Self-Timer Mode to ensure everyone, including the photographer, is in the shot.
Long Exposures: Use Remote Release or Mirror Lock-Up Mode to avoid camera shake.
Quiet Environments: Use Quiet Mode to minimize shutter noise.
Resources
Shutter Speed Photography – Shutter Speed Chart
https://www.photographer.org/shutter-speed/
What Are Drive Modes on Your Camera and How to Use Them? – Digital Photo Mentor
https://www.digitalphotomentor.com/camera-drive-modes/
‘Help! My Photos Are Not Sharp.’ How Can You Avoid Blurry Images? | Fstoppers
https://fstoppers.com/education/help-my-photos-are-not-sharp-how-can-avoid-blurry-images-650414
Articles | PhotoPills
https://www.photopills.com/articles
Homework
Capture the same scene three ways:
- A good exposure
- One stop underexposed
- One stop overexposed
The key is to change one setting at a time (ISO, shutter speed, or aperture) so it’s clear what each setting does.
Setup
- Sit in one spot and choose a scene that won’t change much for a few minutes (no fast-moving subjects).
- Keep the camera pointed at the same composition for the whole exercise.
Step 1: Make a “good exposure” (your baseline)
- Set a starting ISO (pick something reasonable for the light, like ISO 100–400 outside or ISO 400–1600 inside).
- Choose an aperture and shutter speed that make sense for the scene.
- Take a test photo.
- Use your meter (the exposure scale in the viewfinder/back screen) and/or the histogram to adjust until the exposure looks good.
- Take the baseline photo and label it (in your notes or by memory): Baseline (0).
Step 2: Underexpose by one stop (−1) — change ONE variable
Take three separate “−1 stop” photos, each created a different way. After each photo, return to the baseline settings before trying the next method.
Method A: ISO only
- From the baseline, change ISO down by 1 stop.
- Example: 400 → 200, or 800 → 400
- Keep shutter speed and aperture the same.
- Take the photo. (This should be −1.)
Method B: Shutter speed only
- Return to the baseline.
- Change shutter speed faster by 1 stop.
- Example: 1/125 → 1/250, or 1/60 → 1/125
- Keep ISO and aperture the same.
- Take the photo. (This should be −1.)
Method C: Aperture only
- Return to the baseline.
- Change aperture smaller by 1 stop (a higher f-number).
- Example: f/4 → f/5.6, or f/5.6 → f/8
- Keep ISO and shutter speed the same.
- Take the photo. (This should be −1.)
Step 3: Overexpose by one stop (+1) — change ONE variable
Take three separate “+1 stop” photos, each created a different way. After each photo, return to the baseline settings before trying the next method.
Method A: ISO only
- From the baseline, change ISO up by 1 stop.
- Example: 200 → 400, or 400 → 800
- Keep shutter speed and aperture the same.
- Take the photo. (This should be +1.)
Method B: Shutter speed only
- Return to the baseline.
- Change shutter speed slower by 1 stop.
- Example: 1/250 → 1/125, or 1/125 → 1/60
- Keep ISO and aperture the same.
- Take the photo. (This should be +1.)
Method C: Aperture only
- Return to the baseline.
- Change aperture wider by 1 stop (a lower f-number).
- Example: f/8 → f/5.6, or f/5.6 → f/4
- Keep ISO and shutter speed the same.
- Take the photo. (This should be +1.)
After you’ve taken all the photos, compare them side-by-side.
- Which method changed the look of the photo the most (depth of field, motion blur, noise)?
- Which method changed the exposure without changing the look much?
- Which setting would you choose first in this lighting situation, and why?
Class 3: Aperture, Depth of Field and Focus Points
Overview: We quickly reviewed the Exposure Triangle and dove right into Depth of Field and shutter speed. We did some activities and looked at Focus points, including Back button Focus.
Depth of Field (DoF) calculator | PhotoPills
- Definition
- The zone from the nearest to the farthest point in your scene that remains in focus. Imagine you’re taking a portrait: DoF determines whether just the subject’s eyes are sharp or if their entire face is in focus, along with the background.
- Key Points about Depth of Field
- Acceptably Sharp: The term “acceptably sharp” is subjective. It depends on factors like how you’ll view the image (print, screen, etc.) and your vision.
- Factors Influencing DoF
- Aperture: The size of the lens opening (measured in f-stops) significantly affects DoF. Larger apertures (smaller f-stop numbers) create a shallow DoF, where only a small slice of the image is in focus. Smaller apertures (higher f-stop numbers) result in a deeper DoF, where more of the scene is sharp.
- Camera-Subject Distance: The closer you are to your subject, the shallower the DoF. Conversely, greater distance increases the depth of field.
- Focal Length: Longer lenses (higher focal lengths) tend to have shallower DoF, while wider lenses (shorter focal lengths) provide more depth.
- Sensor Size: Larger sensors (commonly found in full-frame cameras) generally yield shallower DoF compared to smaller sensors (like those in crop-sensor cameras).
- Visualizing DoF
- Imagine a narrow DoF as a photo where only a small sliver is in focus (like a blurred background behind a subject).
- Conversely, a large DoF means much more of the scene is sharp (think landscapes where both foreground flowers and distant mountains are clear).
- Practical Tips
Portraits: For creamy backgrounds and subject isolation, use wider apertures (e.g., f/1.8 or f/2.8).
Landscapes: Smaller apertures (e.g., f/8 or f/11) help keep everything sharp from foreground to background.
Experiment: Play with different settings to see how DoF changes. It’s a creative tool!
Focus Point Options – you may not have all of these! They are camera dependent. Use these is telling the camera what you want it to focus on.
- Single-Point AF
- Description: This mode allows you to select a single focus point manually. The camera will focus on the subject located at that specific point. This is my usual go-to.
- When to Use: Ideal for precise focusing, such as in portrait photography where you want to focus on the subject’s eyes. It’s also useful for still subjects and when you need to control exactly where the focus should be1.
- Dynamic Area AF
- Description: You select a single focus point, but the camera also considers surrounding points to maintain focus if the subject moves slightly.
- When to Use: Great for photographing moving subjects, such as children playing or animals in motion. It provides a balance between precision and flexibility.
- Zone AF
- Description: The camera divides the frame into zones, and you can select a zone where the camera will focus. It uses multiple focus points within that zone.
- When to Use: Useful for subjects that move within a specific area of the frame, such as sports photography or events where the action is concentrated in one part of the scene. Best if you don’t care what the camera focuses on (random people on a team, in a crowd, a flock of birds, etc).
- Auto-Area AF
- Description: The camera automatically selects the focus points based on the subject’s position and movement. It often uses advanced algorithms to detect faces or subjects.
- When to Use: Best for quick snapshots or when you need to capture a moment without having time to manually select focus points. It’s convenient for casual photography and situations where the subject is unpredictable. When in doubt, don’t use this.
- Group-Area AF
- Description: This mode uses a cluster of focus points to track a subject. It’s more focused than Zone AF but covers a larger area than Single-Point AF.
- When to Use: Ideal for tracking larger subjects or groups of people. It’s useful in wildlife photography where the subject might move unpredictably, or when your subject (or kid) is kinda far away and you just need their head to be in focus.
Summary of When to Use Each Focus Point Option (remember to keep depth of field in mind)
- Single-Point AF: Portraits, still subjects, precise focusing.
- Dynamic Area AF: Moving subjects, children, pets.
- Zone AF: Sports, events, concentrated action.
- Auto-Area AF: Quick snapshots, casual photography, unpredictable subjects.
- Group-Area AF: Wildlife, groups of people, larger subjects.
Tips for Using Focus Points
- Focus and Recompose: For static subjects, you can use the focus and recompose technique. Focus on your subject using a single point, then recompose your shot while keeping the focus locked. This advice is often given to beginners, but remember depth of field – if you shift your plane when you recompose, your subject might not still be in focus. I never got this to work, your mileage might vary.
- Back-Button Focus: Consider using back-button focus to separate focusing from the shutter release. This can give you more control, especially in dynamic shooting situations. This is what pros use.
- Make subject speed changes in Focus Menu
- If camera won’t focus, step back a step (you maybe too close)
Focus Modes – Telling the camera how to focus.
1. Single Shot Autofocus (AF-S or One Shot AF)
- When to Use: Ideal for stationary subjects like landscapes, portraits, buildings or still life.
- How It Works: The camera focuses when you half-press the shutter button and locks the focus until you take the shot. This ensures your subject remains sharp as long as it doesn’t move.
2. Continuous Autofocus (AF-C or AI Servo AF)
- When to Use: Best for moving subjects such as sports, wildlife, or children playing.
- How It Works: The camera continuously adjusts focus as the subject moves, ensuring it stays sharp even if it changes position. It can hunt for focus or eat up your battery or both!
3. Automatic Autofocus (AF-A or AI Focus AF)
- When to Use: Useful in unpredictable situations where subjects might switch between being stationary and moving.
- How It Works: The camera automatically switches between single and continuous autofocus modes based on the subject’s movement. My camera used to have this and it was my favorite.
4. Manual Focus (MF)
- When to Use: Ideal for precise focusing needs, such as macro photography, low-light conditions, or when autofocus struggles.
- How It Works: You manually adjust the focus ring on the lens to achieve sharpness. This mode gives you full control over what part of the scene is in focus if you can see it! You may need to look at your Live View and zoom in if you camera has that capability. Cameras are much better at focusing than we are as a general rule.
Tips for Using Focus Modes:
- Portraits: Use AF-S to lock focus on the subject’s eyes.
- Action Shots: Use AF-C to track and maintain focus on moving subjects.
- Low Light: Switch to MF if the camera struggles to find focus.
- Mixed Situations: Use AF-A to let the camera decide the best mode based on the situation.
Bonus material: File handling basics (so you don’t lose photos)
- Don’t format until you’ve confirmed import + backup
- One simple folder structure
- One copy is the same as having zero copies – try to back up your photos to three places. 1) a cloud backup service, 2) a second copy on your computer, 3) your card until you know it’s been backed up to the cloud.
Resources
bokeh – Google Search
https://www.google.com/search?q=bokeh&sca_esv=9eff12e450c8c5f1&rlz=1C1CHZN_enUS1119US1119&udm=2&biw=1344&bih=706&sxsrf=AE3TifNk4hucsWeK3SR413Z89RcRAzfYqA%3A1759416435030&ei=c5DeaITAAfvIp84PhePpgAs&ved=0ahUKEwjExfz84IWQAxV75MkDHYVxGrAQ4dUDCBE&uact=5&oq=bokeh&gs_lp=Egtnd3Mtd2l6LWltZyIFYm9rZWgyCBAAGIAEGLEDMggQABiABBixAzIIEAAYgAQYsQMyCBAAGIAEGLEDMgUQABiABDIFEAAYgAQyBRAAGIAEMgUQABiABDIFEAAYgAQyCxAAGIAEGLEDGIMBSMoWUJAFWMAScAF4AJABAJgBUKABlwGqAQEyuAEDyAEA-AEBmAIDoAKiAcICBhAAGAcYHsICBxAjGCcYyQLCAgoQABiABBhDGIoFmAMAiAYBkgcBM6AHzAqyBwEyuAeeAcIHBTAuMi4xyAcH&sclient=gws-wiz-img#sv=CAMSURoyKhBlLTJpNDdGSzlBbmpiUlRNMg4yaTQ3Rks5QW5qYlJUTToOZy10U1g1MTI0c3F2Q00gBCoXCgFzEhBlLTJpNDdGSzlBbmpiUlRNGAEwARgHIICNrLkESggQAhgBIAIoAQ
Depth of Field (DoF) calculator | PhotoPills
https://www.photopills.com/calculators/dof#embed
The Web’s Original CameraSim
https://www.camerasim.com/original-camerasim
Exposure Simulator
http://www.andersenimages.com/tutorials/exposure-simulator/
DIY – Create Your Own Bokeh
https://www.diyphotography.net/diy_create_your_own_bokeh/
so busy_SMB5296 | One of the best intersections in all of Ch… | Flickr
https://www.flickr.com/photos/stevebond/21144458031/in/photolist-ydsSHe-MDgQzK-23jSC4r-CuDGvR-P6odd9-Ek3aPB-on4EvS-QSmZ6g-27k6xoR-21XKHUn-TbKAKv-2erRHND-MDgQ7k-JjoLfD-dnvbxE-b7Qni8-TtxvfE-dXbbGu-eiV5z5-e5fYav/
Focusing in Photography Explained – How to Focus in Photography
https://capturetheatlas.com/focusing-in-photography/#:~:text=Focus%20points%20in%20photography%20are,focusing%20points%20than%20mirrorless%20cameras
Camera Focus Points Explained – PhotoWorkout
https://www.photoworkout.com/camera-focus-points/
What is Back Button Focus and Why You Should be Using It
https://photographylife.com/back-button-focus
Camera Focus Modes Explained: AF-S, AF-C, Manual & More
https://greatbigphotographyworld.com/blog/focus-modes
premiere-photo-homme-paris.jpg (1200×862)
https://www.unjourdeplusaparis.com/wp-content/uploads/2015/05/premiere-photo-homme-paris.jpg
Homework
Look at the Camera Simulators
Activity :
Aperture experiment: get one, two or three items in focus. Start at your lowest aperture, a shutter speed of 1/100 and iso 100, and raise your aperture (and compensate with your other settings) until the depth of field is deep enough to have everything in focus.
Shutter speed: start at the same setting set as above, and keep increasing your shutter speed to capture fan blades or a flag waving or cars (have situational awareness!!! be safe!!!!).
Class 2: "Good Exposure" and Histograms
Overview: We looked at what makes a “Good Exposure” and talked about how we measure light in stops. We also looked at Flickr images and explored what we like visually, as well as develop our eye for our style, subject and tone. ALSO – please excuse the formatting, WordPress is hard.
Understanding Exposure – What is a Good Exposure?
In photography, “good exposure” refers to an image that has the optimal balance of light and dark areas, ensuring that details are visible in both the highlights (bright areas) and the shadows (dark areas). A good exposure means that the image accurately represents the scene as intended by the photographer, without being too bright (overexposed) or too dark (underexposed). Cameras measure the scene and want its settings to equal 18% grey (the midpoint between darkest shadows and lightest highlights).
We increase or decrease our exposure in ‘stops’. ‘Stops’ are relative to your initial exposure (unless you want to do math). The difference between stops is either twice the amount of light or half the amount of light, depending on if you are letting more light into your camera or less light into your camera. Stops can be full stops, 1/2 stops or 1/3 stops.
We read our exposure on our in-camera meter that I call ‘the ticker’ – the middle of the ticker is a good exposure.
Key Elements of a Good Exposure:
- Detail in Highlights and Shadows:
- The brightest parts of the image (highlights) retain detail without appearing “blown out” or pure white. Our example was the white bird.
- The darkest parts of the image (shadows) retain detail without appearing completely black.
- It’s easier to bring back detail in the blacks and shadows than in blown highlights – this is the opposite of film!
- Correct Overall Brightness:
- The image is not too dark (underexposed) or too bright (overexposed). The mid-tones are well-balanced.
- Proper Contrast:
- There is an appropriate range of tones from dark to light, showing depth and dimension to the image.
- Color Accuracy:
- Colors appear natural and true to life, unless a specific artistic effect is intended.
- Intentional Exposure:
- The exposure matches the photographer’s creative vision and intent, whether it’s aiming for a realistic representation or a specific mood or effect. Choosing your intentional exposure is an artistic choice.
- Ansel Adams Zone System – just know it exists
Exposure triangle
- Shutter Speed:
- Controls the duration of light hitting the camera sensor. Faster shutter speeds let in less light, while slower shutter speeds let in more light.
- Aperture:
- The size of the lens opening that allows light to enter. Larger apertures (smaller f-numbers) let in more light, while smaller apertures (larger f-numbers) let in less light. This is a sneaky part of photography. Aperture and focal distance control depth of field – more on this later.
- ISO:
- The sensitivity of the camera sensor to light. Lower ISO values require more light but produce less noise, while higher ISO values are more sensitive to light but can introduce noise. Lots of noise/grain can make the image less sharp/in focus, and can look icky.
- Shutter Speed:
Factors Affecting Exposure: The Exposure Triangle
- Lighting Conditions:
- Natural and artificial light sources, their intensity, direction, and quality affect the exposure.
- Reflectivity of the Scene:
- The brightness and colors of the subjects and backgrounds in the scene can impact the overall exposure. (e.g., Snow vs dusk)
Achieving Good Exposure:
- Finding the right balance between these factors to capture an image that is visually pleasing and meets the photographer’s goals, which is subjective!
Homework
- Assignments
- Take photos from photo bingo and submit them to me via WeTransfer.com. Pick a row from your bingo chart to go shoot. Bingo Card Sets with photo prompts. Shoot at F/8!
- Figure out your minimum handheld shutter speed by starting in Shutter speed priority mode and photograph a stationary object. Keep lowering your shutter speed and taking photos until the object is blurry from camera shake. The shutter speed above that is your minimum handheld shutter speed. This may change with different lenses, but it’s a starting point to be aware of.
- Google how to turn the ‘blinkies’ (Canon) or ‘zebra stripes’ (Nikon) on for your camera.
- Send me more Flickr URLs, 2-3 per person if you haven’t already.
Resources
The Exposure Triangle – A Beginner’s Guide
Exposure Stops in Photography – A Beginner’s Guide
https://photographylife.com/what-are-exposure-stops-in-photography
Understanding Histograms in Photography
Exposing to the Right Explained
https://photographylife.com/exposing-to-the-right-explained
Histogram: Discover How To Take Better Photos By Exposing To The Right
https://photographypro.com/histogram/
Underexposure vs Overexposure – A Beginner’s Guide
https://photographylife.com/underexposure-and-overexposure-in-photography
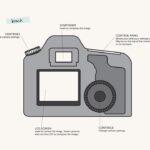

Class 1: Camera overview
Overview: We made introductions and dove right into to learning how to change our shutter speed, aperture and ISO. We also figured out how to move our focal points! We looked at the EXIF metadata of some Flickr images and started to talk about what we like and why we like it.
Parts of the camera
The images above should help you identify parts of your camera. We looked at:
- Shutter
- Focus – half press
- Viewfinder
- Numbers on lenses
- Modes – Manual
- Metering Modes (just id’d it on the LCD)
- Focus modes and focusing (same)
- Choosing image size (RAW vs jpeg)
- White Balance (LCD)
- Drives (LCD)
- Flash AND/OR hot shoe
- Fractional stops (full stops vs 1/2 or 1/3 stops)
- Exposure meter (LCD or through viewfinder)
Resources
As we go, I’ll give you more resources here.
Homework
- Note Down the Specs of Your Camera and Lens
- Flash or no flash?
- Number of focal points
- ISO range
- Aperture min – max
- Crop sensor or Full Frame?
2. Identify 3-5 Images You Like on Flickr – Be prepared to talk about why you like it. Even better if it has EXIF data.
3. Practice Changing ISO, SS, and AP Without Looking at Camera – Watch exposure meter and try different combos. Take photos at different combos and see if photo is too dark, too light, or just right. The table is at the bottom of this.
4. Practice engaging focus by putting your subject underneath your focal point and half-pressing your shutter button
5. Practice Identifying Parts of the Camera
Full Stops
| ISO | Aperture (f-stop) | Shutter Speed (seconds) |
|---|---|---|
| 100 | f/2.8 | 1/1000 |
| 200 | f/4 | 1/500 |
| 400 | f/5.6 | 1/250 |
| 800 | f/8 | 1/125 |
| 1600 | f/11 | 1/60 |
| 3200 | f/16 | 1/30 |
| 6400 | f/22 | 1/15 |
| 12800 | f/2.8 | 1/8000 |
| 25600 | f/4 | 1/4000 |
| 51200 | f/5.6 | 1/2000 |
1/2 and 1/3 stops
| ISO | Aperture (f-stop) | Shutter Speed (seconds) |
|---|---|---|
| 100 | f/2.8 | 1/1000 |
| 125 | f/4 | 1/800 |
| 160 | f/5.6 | 1/640 |
| 200 | f/8 | 1/500 |
| 250 | f/11 | 1/400 |
| 320 | f/16 | 1/320 |
| 400 | f/22 | 1/250 |
| 500 | f/2.8 | 1/2000 |
| 640 | f/4 | 1/1600 |
| 800 | f/5.6 | 1/1250 |