Monday Beginning Camera
Class 8: Lightroom Classic Intro
Overview: thanks for your flexibility!
- A. Overview of Lightroom Classic and its features
- Catalog – what is is and why is it important?
- It is the notebook of all your file locations and changes. It does not house your images.
- Images are imported into the catalog – LRC cannot edit images it doesn’t know about.
- Module interfaces:
- Top panel: ID plate and Module Picker, progress bars
- Work area: the main preview and work area. Where you select, review, sort, compare and apply adjustments. This window changes depending on the module.
- Toolbar: the strip between the work area and filmstrip. Show or hide by pressing ‘T’. Can set flags, rating, or labels.
- The Filmstrip: gives access to all your images in catalog or collection. (Go to ‘window’>Panels to show if not visible. Can also assign flags, ratings or color label here, meta data, etc.
- Side panels: Content will change with module. Can auto hide, or manually hide.
- Catalog – what is is and why is it important?
- Modules
- Library Module: Think of this as your photo filing cabinet. Organize your images, rate them, and create collections.
- Develop Module: The creative playground! Adjust exposure, colors, and more
- Map: Allows you to view and organize your photos based on their geographic location. You can add location data to your photos and see where they were taken on a map.
- Book: Enables you to create photo books. You can design layouts, add text, and arrange your photos to create a custom photo book that can be printed or saved as a PDF.
- Slideshow: Let’s you create slideshows of your photos. You can add transitions, music, and text to create a dynamic presentation of your images.
- Print: Provides tools for printing your photos. You can create custom print layouts, add watermarks, and adjust print settings to ensure your photos look great on paper.
- Web: Allows you to create web galleries of your photos. You can choose from various templates and customize the appearance of your gallery before exporting it for online sharing. No one uses this, it looks terrible.
- B. Lightroom Classic workflow
- The step-by-step process from import to export.
- Import: Bring your photos into Lightroom Classic in Library Module from memory card, hard disk or other storage, or through tethering.
- Organize: Sort, rate, and tag your images. Add keywords and other metadata.
- Process and Edit: In Develop Module, enhance exposure, contrast, and colors. Crop, correct and retouch.
- Create a slideshow, print, book or web page.
- Export: Share your polished photos with the world with a publishing plug-in or export them as you need them.
- Managing photos – always move images within Lightroom, not without.
- The step-by-step process from import to export.
- Previews: Minimal – smallest previews embedded in the photos
- Embedded and Sidecar – largest possible preview available. Slower than Minimal but faster than Stardard.
- Standard preview – displays as LRC renders them
- 1:1
- Smart previews – adds more flexibility to your workflow but takes a while to generate. Is what you edit on LR mobile.
- Catalogs keep your photos organized and prevent chaos.
- Create catalogs for different projects or clients – can be big or little, or can merge them later.
Class 7: Composition
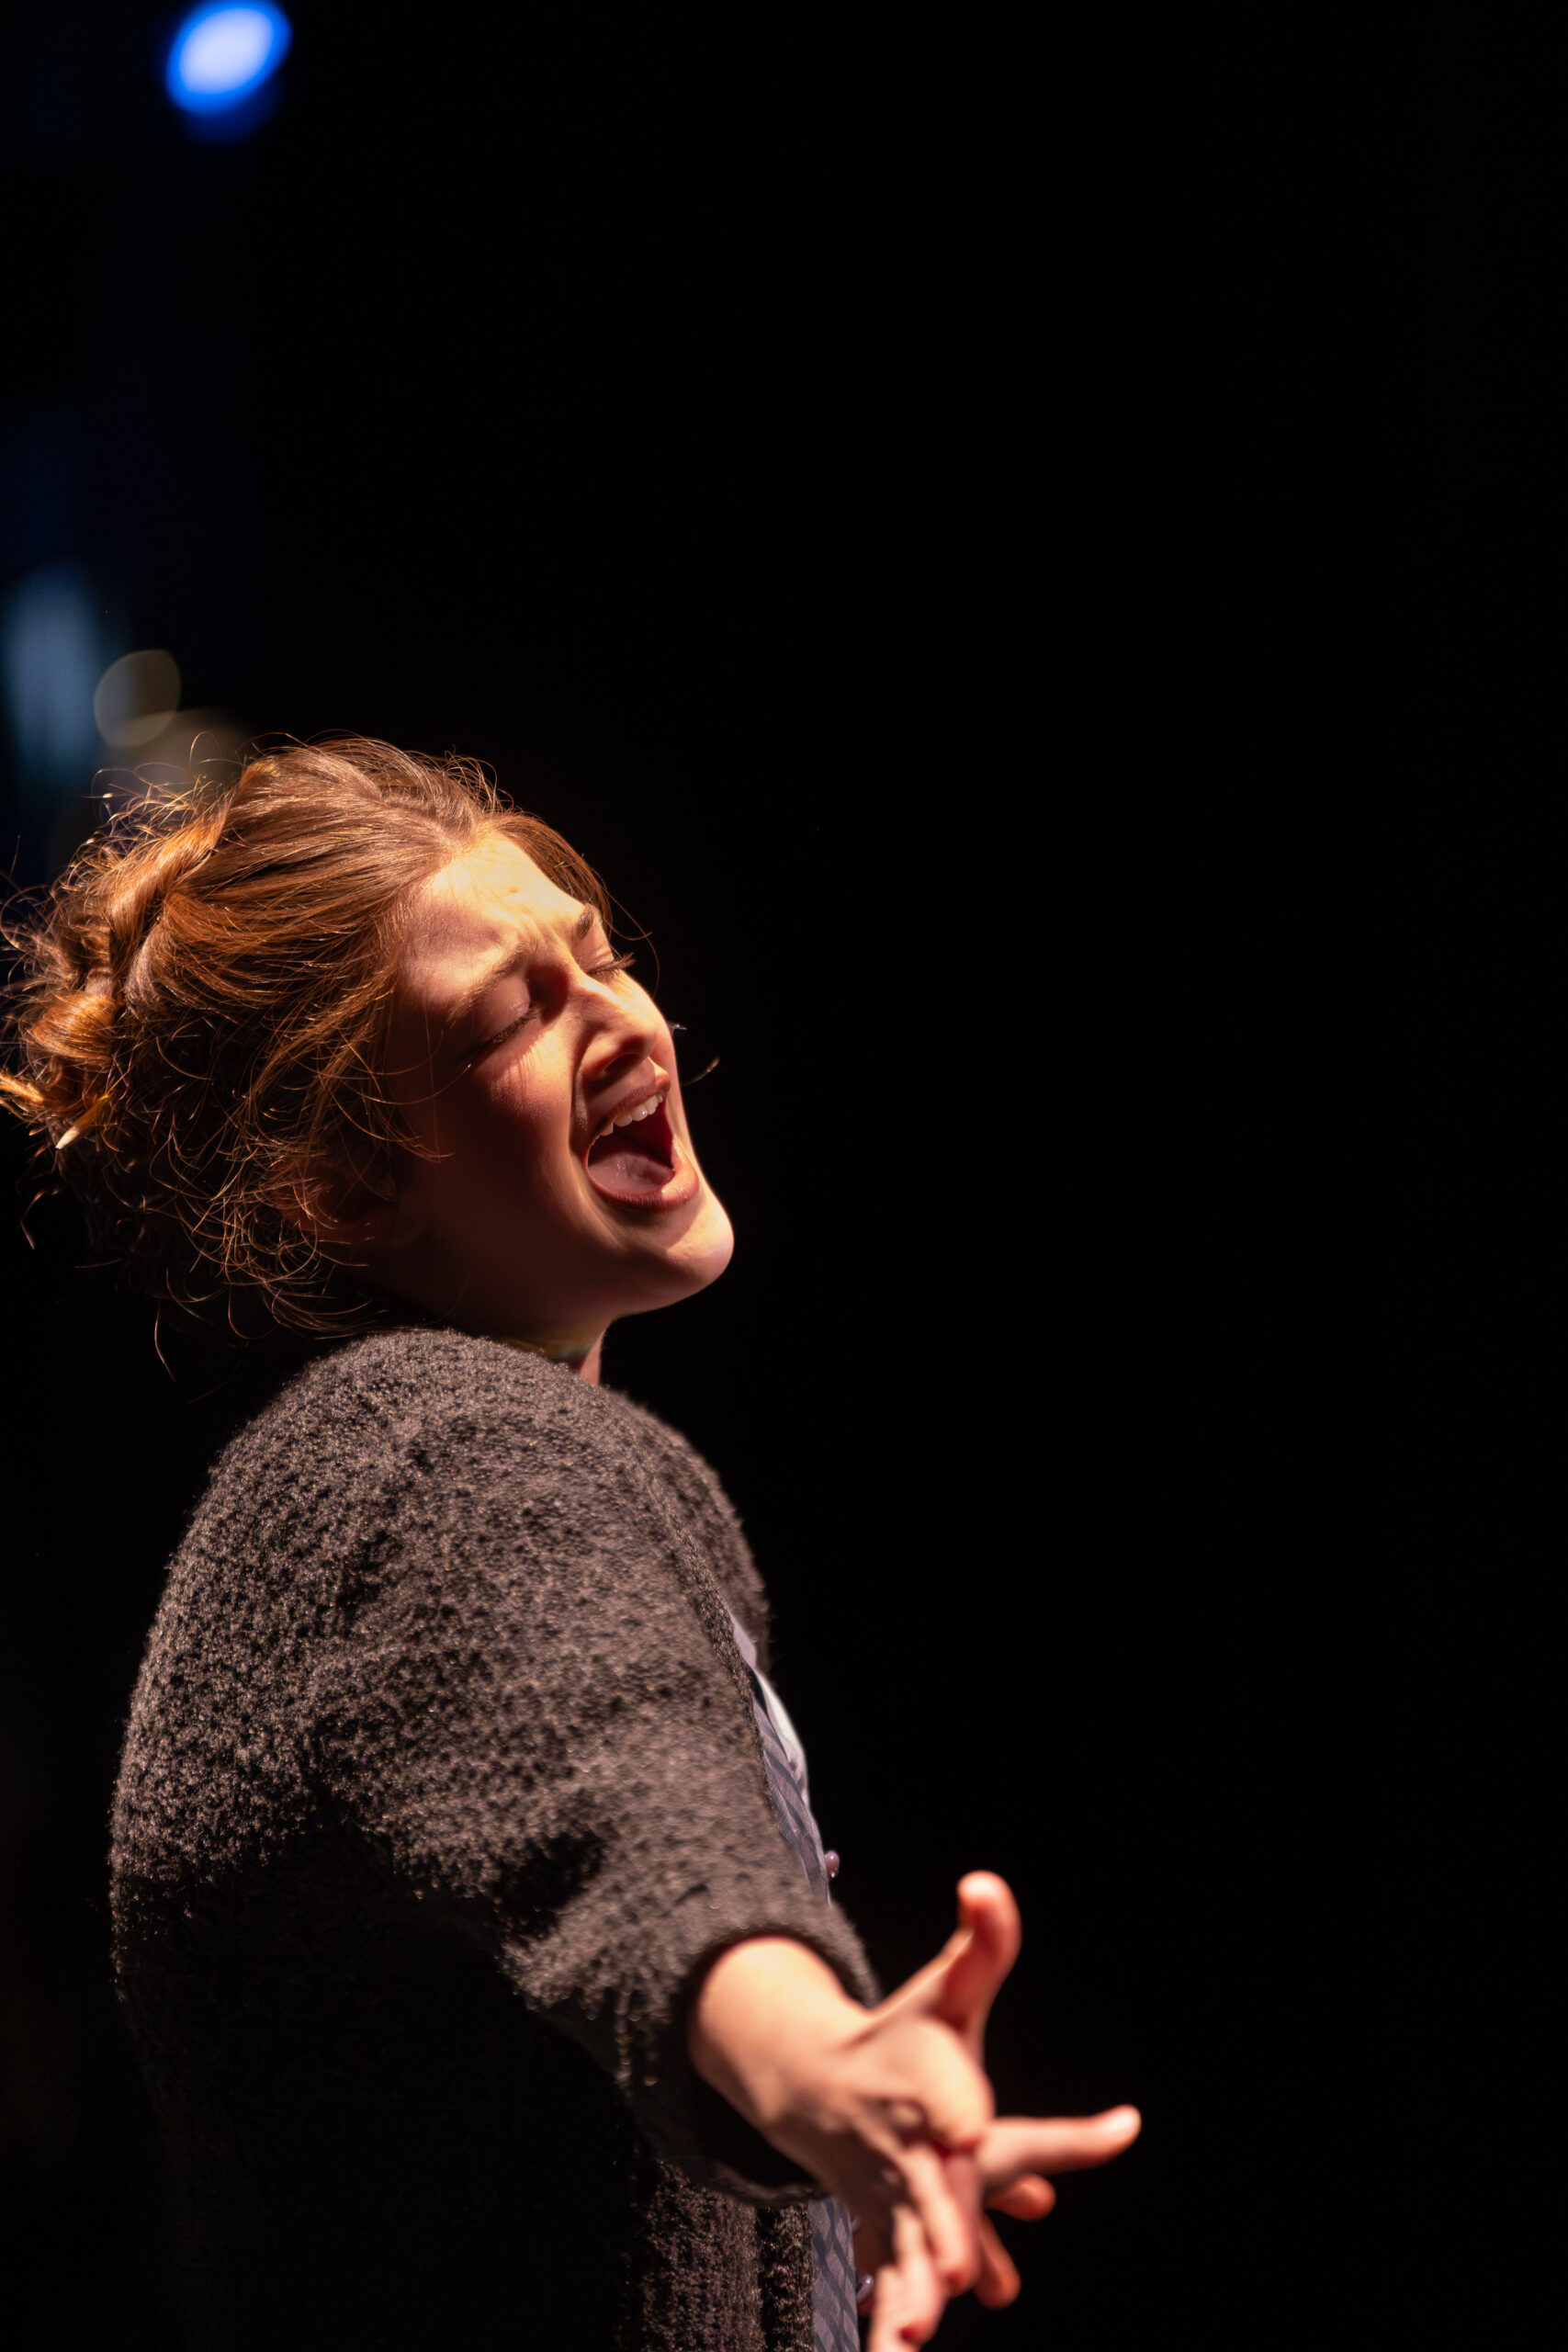
Overview: We discussed composition techniques and reviewed some award-winning photos.
*Composition can be done in the camera or cropped in post so shoot wider than you would normally.
Rule: when in doubt, fill the frame. What is the image about? The animal or its habitat? Get closer if you can.
Composition techniques:
Rule of Thirds: The classic rule of thirds involves mentally dividing your frame into a 3×3 grid and positioning your subject or key elements along these lines or at their intersections. It’s a simple yet powerful technique to create balance and interest.
If you’re capturing a portrait, align the subject’s eyes or other important features with these power points. Similarly, when photographing landscapes, position the horizon or prominent elements along the gridlines or at the intersections. Focus on the nearest eye.
- Why It Works:
- The rule of thirds encourages you to avoid placing your subject dead center in the frame. Centered compositions can sometimes feel static or less engaging.
- By using the intersections, you introduce asymmetry and dynamic tension. The viewer’s eye naturally moves along these lines, adding interest and guiding their gaze.
- Variation in Intersection Importance:
- While all four intersections are relevant, some photographers argue that the top-left and bottom-right intersections (diagonally opposite each other) tend to be more visually powerful.
- The top-left intersection is often associated with the starting point for reading an image (like reading a book from left to right). Placing a subject there can create a sense of anticipation.
- The bottom-right intersection is where the eye tends to linger. It’s a strong point for emphasizing a subject or creating a focal point.
- Leave space – put your subject on a third line and let them look out to the other one.
- Why It Works:
Leading Lines: Learn how to use lines—whether they’re actual lines in your scene (like roads, fences, or rivers) or implied lines (like the direction someone is looking)—to guide the viewer’s eye through your photo. They draw your attention, create balance, and add interest.
- Types:
- Vertical – from the bottom to the top, add depth.
- Horizontal – side to side. Can intensify a scene when they cut across the frame (think of a road).
- Diagonal lines – can converge on a point and pull us along.
- Curved lines – like a river or winding path, elegant and fluid.
- Finding leading lines:
- Look around! Roads, bridges, fences, railway tracks, shorelines, architectural features—all fair game.
- Even everyday objects—like the lines on a basketball court or the edge of a table—can become leading lines.
*Others:
- Framing: Use natural or man-made frames (think archways, windows, or tree branches) to draw attention to your subject.
- Foreground and Background: Pay attention to both foreground and background elements. Sometimes what’s happening behind your subject is just as important as the subject itself.
- Symmetry and Patterns: Symmetry and patterns in photography, such as reflections, repeating shapes, or perfectly aligned elements, can create striking compositions.
- Negative Space: Use empty or negative space intentionally. Sometimes what you leave out of the frame is just as impactful as what you include.
- Balance and Visual Weight: Distribute visual weight in your composition. Balance doesn’t always mean perfect symmetry; it’s about achieving harmony.
- Symmetrical Balance
- Asymmetrical Balance
- Color Balance
- Tonal Balance
- Conceptual Balance
- Viewpoint and Perspective: Experiment with different viewpoints—get low, climb high, or shoot from unexpected angles (this is the ABCs of shooting). Changing your perspective can transform an ordinary scene.
- Depth and Layering: Add depth to your photos by layering foreground, middle ground, and background elements to create a sense of dimension.
- Golden Triangle: One popular concept related to triangles is the golden triangle, which divides the frame into four triangles.
- Here’s how it works:
- Draw a diagonal line from one corner of the frame to the opposite corner.
- Add two more lines from the remaining corners to intersect the first line at a right angle.
- The golden triangle suggests three approaches:
- Fill one of the triangles with a main subject.
- Align diagonal subject matter with at least one of the diagonal golden triangle lines.
- Line up a significant point in the composition with a point of intersection.
- Golden Spiral
- Where to Find the Golden Spiral?
- Look at the shell of the Nautilus, a marine cephalopod. Its shell follows the Golden Spiral precisely.
- In photography, you won’t always find a literal spiral, but you can create a visual path that mimics its flow. Think of it as a subtle, invisible guide within your frame.
- Types:
Using the Golden Spiral in Your Compositions:
- Leading Lines: Arrange elements (like roads, fences, or tree branches) to follow the spiral’s path. These lines can lead the viewer’s eye along the curve.
- Subject Placement: Position your main subject near one of the spiral’s intersections. This draws attention and adds balance.
- Crop and Framing: During post-processing, consider cropping your image to align with the spiral. Use the spiral’s flow to guide your composition.
Emphasis and Dominance: Whether through selective focus, lighting, or positioning, make sure your viewer’s eye goes exactly where you want it to.
Rule of Odds
A couple versions of the rule of odds show up in art and design, but they land in the same place. An odd number of elements, often three, tends to feel more balanced and more dynamic than an even number. That’s why the idea carries over cleanly into photography composition.
Storytelling
- Shoot from Above, Below, and the Center:
These three approaches offer different perspectives and can significantly impact the visual storytelling in your photographs:
From Above (Bird’s Eye View): Capturing scenes from a high vantage point provides a unique view. It can evoke a sense of freedom or omnipotence. Think of it as looking down on the world.
From Below (Low Camera Angles): Shooting upward can elevate your subject, making it appear more powerful or imposing. This angle often creates a sense of intimidation or authority.
From the Center (Straight On): Shooting straight at eye level creates intimacy and a direct connection with viewers. It invites them to be part of the scene.
Working from the Side: Offers a profile view that can add depth and context.
Wide Angles Views: Capture a broader scene, providing more context and often emphasizing scale.
Close Ups Shots: Highlight fine details and evoke strong emotions by focusing tightly on the subject.
Tilted Angles: Add a dynamic, sometimes unsettling feel, which can intensify the viewers’ experience.
Storytelling often needs more than one photo to tell the story.
Camera Angles
- Bird’s Eye View / High Camera Angles: Capturing from above can create a sense of freedom or omnipotence, offering a dramatically different perspective.
- Shooting from Below / Low Camera Angles: Elevates the subject, making it appear more powerful or imposing.
- Looking Straight On / Point-of-View: Creates intimacy and direct connection with viewers, making them feel part of the scene.
- Working from the Side: Offers a profile view that can add depth and context.
- Wide Angles Views: Capture a broader scene, providing more context and often emphasizing scale.
- Close Ups Shots: Highlight fine details and evoke strong emotions by focusing tightly on the subject.
- Tilted Angles: Add a dynamic, sometimes unsettling feel, which can intensify the viewers’ experience. Called Dutch angle.
What is Balance in Photography?
- Symmetrical Balance
- Asymmetrical Balance
- Color Balance
- Tonal Balance
- Conceptual Balance
Resources
What is Balance in Photography? – 42West, Adorama
https://www.adorama.com/alc/what-is-balance-in-photography/
The Psychology of Camera Angles: How Perspective Shapes Every Photo – PhotoWorkout
https://www.photoworkout.com/camera-angles/
What is Balance in Photography? – 42West, Adorama
https://www.adorama.com/alc/what-is-balance-in-photography/#symmetrical
Rule of Thirds in Photography: A Complete Guide | PetaPixel
https://petapixel.com/rule-of-thirds/
What Is The Golden Triangle Rule And How To Use It – Infrared Conversions, IR Modifications & Photography Tutorials | Life Pixel IR
https://www.lifepixel.com/photo-tutorials/what-is-the-golden-triangle-rule-and-how-to-use-it
The Art of Seeing Patterns: Tips for Mastering Pattern Photography – Adorama
https://www.adorama.com/alc/pattern-photography/
22 Essential Photography Composition Rules
https://greatbigphotographyworld.com/compositional-rules-in-photography-start-here/
Homework
Send me Flickr images and your own personal images – we’ll be doing Lightroom Classic next week so I’m happy to edit anything you want me to edit.
Try photographing using these composition Techniques:
- Rule of Thirds Exercise: Take photos using the rule of thirds. Compose shots with the subject at different intersections.
- Leading Lines Practice: Find and photograph leading lines in your environment.
- Symmetry and Patterns: Capture photos that emphasize symmetry and patterns.
- Framing Techniques: Use natural frames (like windows or arches) to frame your subject in photos.
- Negative Space: Take photos that utilize negative space effectively.
- Different Perspectives: Shoot the same subject from different angles and heights. Use ABC.
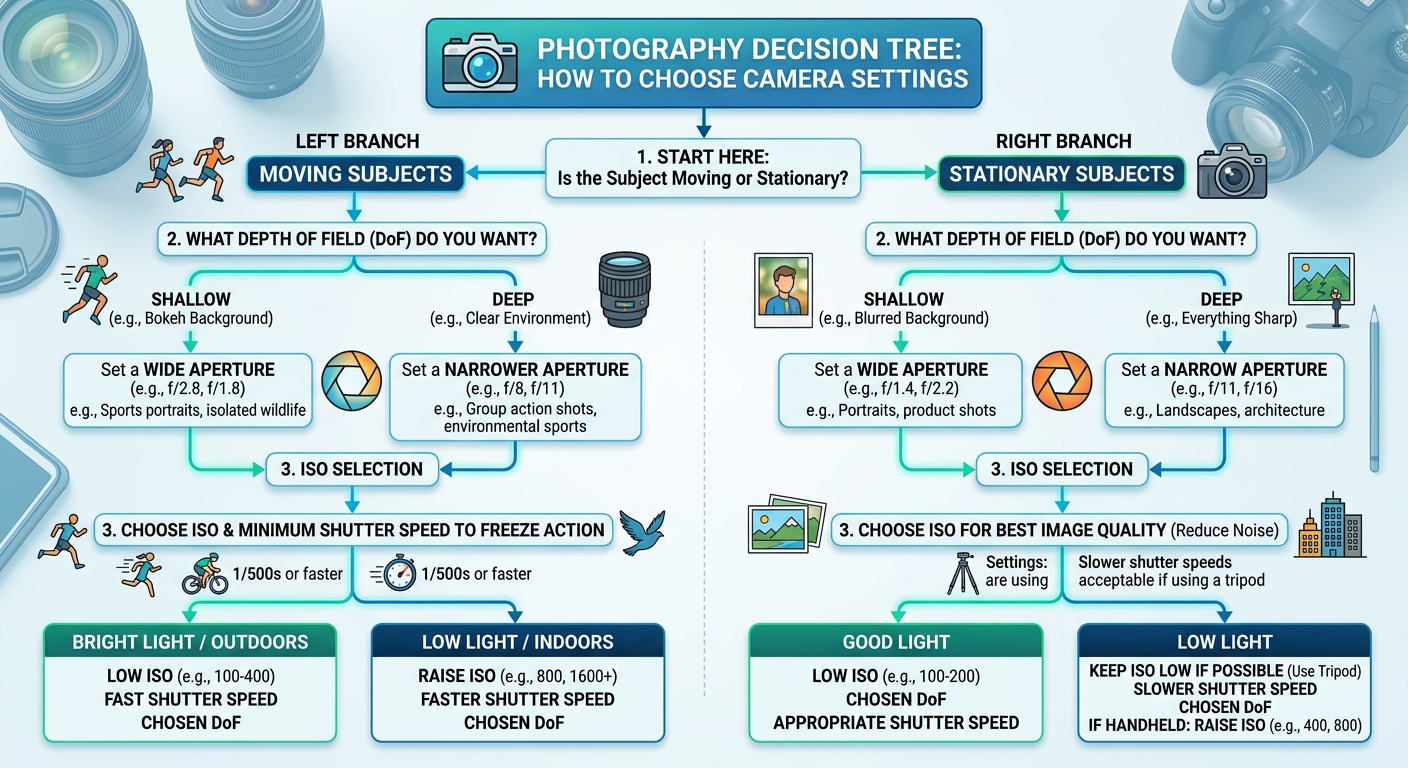
Class 6: Metering Modes, Sunny 16 rule and equivalents, and troubleshooting
Overview: we took a look at the last thing that we might want to change in our cameras and that is Metering Mode! We also explored the Sunny 16 rule, exposure equivalents, and troubleshooting our shots. Decision tree was made with AI, I’m terrible at graphic design.
In-Camera Radiant Meters
In-camera radiant meters, also known as reflective meters, measure the light that bounces off the subject and into the camera lens.
Reflective Metering: The camera’s meter evaluates the light reflecting off the scene. It then calculates the optimal exposure settings (shutter speed, aperture, and ISO) to achieve a balanced exposure. The goal is often to make the scene appear as a middle gray (18% gray), which is a standard reference point.
- Metering Modes: Cameras typically offer different metering modes such as spot, center-weighted, and evaluative/matrix metering. Each mode uses a different method to measure light and determine exposure settings.
- Challenges: Reflective meters can be influenced by the color and brightness of the subject. For example, a very bright or dark subject can lead to incorrect exposure settings because the meter tries to average the scene to middle gray.
External Incident Meters: External incident meters measure the light falling directly onto the subject, rather than the light reflecting off of it. These are handheld devices used by photographers who need precise control over exposure. Here’s how they work:
- Incident Metering: The meter is placed at the subject’s position and pointed towards the camera. It measures the amount of light hitting the subject, providing a more accurate reading of the actual lighting conditions.
- Accuracy: Since incident meters measure the light before it interacts with the subject, they are not affected by the subject’s color or reflectivity. This often results in more consistent and accurate exposure settings.
- Usage: Incident meters are particularly useful in studio photography or situations with controlled lighting, where precise exposure is critical.
*Metering Modes your camera may not have all of these, mine doesn’t.
- Evaluative/Matrix Metering
- Description: This is the default metering mode on most cameras. It divides the frame into multiple zones and evaluates the light in each zone to determine the best overall exposure. It considers factors like the position of the subject, the brightness of the scene, and sometimes even the colors and distances.
- When to Use: This mode is ideal for general photography, especially in well-lit conditions. It’s great for landscapes, street photography, and any situation where the lighting is relatively even across the scene1.
- Center-Weighted Metering
- Description: This mode gives more importance to the light in the center of the frame while still considering the light in the surrounding areas. It doesn’t focus on a single point but rather on a larger central area.
- When to Use: Use this mode for portraits or when your subject is in the center of the frame. It’s also useful in situations where the background is significantly brighter or darker than the subject.
- Spot Metering
- Description: Spot metering measures the light in a very small area of the frame, typically around 1-5% of the viewfinder. This area is usually centered, but some cameras allow you to move the spot to different parts of the frame.
- When to Use: This mode is perfect for high-contrast scenes where you need to ensure that a specific part of the image is correctly exposed. It’s commonly used in wildlife photography, macro photography, and any situation where precise exposure is critical.
- Partial Metering
- Description: Similar to spot metering but covers a slightly larger area, usually around 10-15% of the viewfinder. This mode is less common and is typically found on Canon cameras.
- When to Use: Use partial metering in situations similar to spot metering but where you need a bit more coverage. It’s useful for backlit subjects or when the subject occupies a larger portion of the frame.
- Highlight-Weighted Metering
- Description: This mode prioritizes the brightest parts of the scene to prevent overexposure. It ensures that highlights retain detail and are not blown out.
- When to Use: Ideal for scenes with very bright highlights, such as concerts, stage performances, or any situation with strong backlighting.
Sunny 16 rule
Lighting Condition
Aperture
Shutter Speed
Color Temp
Light Quality
Contrast
Full Daylight (noon)

f/16
1/ISO
5500K
Hard Light
Strong Contrast
Partly Cloudy

f/8–11
1/ISO
6000K
Soft Light
Subtle Contrast
Overcast

f/5.6
1/ISO
7400K
Soft Light
Strong Contrast
Open Shade

f/4
1/ISO
7000–8000K
Soft Light
Subtle Contrast
Sunrise/Sunset

f/2.0
1/ISO
2000–3000K
Soft Light
Subtle Contrast
How to Use This Chart
Basic Rule
Shutter Speed = 1/ISO for all conditions
– ISO 100 = 1/100 second shutter speed
– ISO 200 = 1/200 second shutter speed
– ISO 400 = 1/400 second shutter speed
Aperture Adjustments
As lighting conditions get darker, open the aperture (lower f-number) to let in more light:
– Bright sun → Partly cloudy: 1-2 stops wider
– Partly cloudy → Overcast: 1-2 stops wider
– Overcast → Open shade: 1 stop wider
– Open shade → Sunrise/sunset: 2 stops wider
Additional Notes
– Color Temperature: Higher numbers (cooler/bluer) in shade and overcast conditions
– Light Quality: Hard light creates sharp shadows; soft light creates gradual transitions
– Contrast: Strong contrast has deep shadows and bright highlights; subtle contrast is more even
– White Balance: Adjust camera settings based on color temperature for accurate colors
Equivalent Exposure & Small Stop Adjustments (in Manual Mode)
- Exposure Adjustment Table
# | Starting settings (baseline) | Equivalent setting A (same exposure) | Equivalent setting B (same exposure) | +1/3 stop (brighter) | −1/3 stop (darker) | +1/2 stop (brighter) | −1/2 stop (darker) |
1 | 1/250 • f/8 • ISO 100 | 1/500 • f/5.6 • ISO 100 | 1/125 • f/11 • ISO 100 | 1/200 • f/8 • ISO 100 | 1/320 • f/8 • ISO 100 | 1/180 • f/8 • ISO 100 | 1/350 • f/8 • ISO 100 |
2 | 1/1000 • f/4 • ISO 100 | 1/500 • f/5.6 • ISO 100 | 1/2000 • f/2.8 • ISO 100 | 1/800 • f/4 • ISO 100 | 1/1250 • f/4 • ISO 100 | 1/750 • f/4 • ISO 100 | 1/1500 • f/4 • ISO 100 |
3 | 1/125 • f/5.6 • ISO 400 | 1/250 • f/4 • ISO 400 | 1/60 • f/8 • ISO 400 | 1/100 • f/5.6 • ISO 400 | 1/160 • f/5.6 • ISO 400 | 1/90 • f/5.6 • ISO 400 | 1/180 • f/5.6 • ISO 400 |
4 | 1/60 • f/2.8 • ISO 800 | 1/125 • f/2 • ISO 800 | 1/30 • f/4 • ISO 800 | 1/50 • f/2.8 • ISO 800 | 1/80 • f/2.8 • ISO 800 | 1/45 • f/2.8 • ISO 800 | 1/90 • f/2.8 • ISO 800 |
5 | 1/500 • f/11 • ISO 200 | 1/250 • f/16 • ISO 200 | 1/1000 • f/8 • ISO 200 | 1/400 • f/11 • ISO 200 | 1/640 • f/11 • ISO 200 | 1/350 • f/11 • ISO 200 | 1/700 • f/11 • ISO 200 |
6 | 1/30 • f/8 • ISO 100 | 1/60 • f/5.6 • ISO 100 | 1/15 • f/11 • ISO 100 | 1/25 • f/8 • ISO 100 | 1/40 • f/8 • ISO 100 | 1/20 • f/8 • ISO 100 | 1/45 • f/8 • ISO 100 |
Equivalent Exposure (Same Brightness)
When you change one setting to make the image darker, you can change another to make it brighter by the same amount. The result: same brightness, different creative effect.
Example:
- 1/250 → 1/500 = 1 stop darker
f/8 → f/5.6 = 1 stop brighter
- These balance out.
Why this matters for you:
- Want more background blur? Open the aperture (f/5.6 → f/4) and compensate with shutter speed.
Want to freeze motion? Use a faster shutter and compensate with aperture or ISO.
- This is how you stay in control instead of letting the camera decide.
+1/3 Stop Adjustments
A +1/3 stop change is a tiny brightness shift — about 1.26× more light.
On most cameras, this is one click of the dial.
Example:
- 1/250 → 1/200 = +1/3 stop brighter
Why this matters for you:
- Perfect for nudging exposure when the image is almost right.
- Great for fine‑tuning highlights or shadows without changing the overall look.
+1/2 Stop Adjustments
A +1/2 stop change is a slightly bigger shift — about 1.41× more light.
Example:
- 1/250 → 1/180 = +1/2 stop brighter
Why this matters for you:
- Useful when the exposure is noticeably off but you don’t want a full stop jump.
- Helps you correct quickly without over‑correcting.
A Note About Your Camera’s Clicks
Your camera can be set to adjust in 1/3‑stop or 1/2‑stop increments.
For practice, pick one system and stick with it so the numbers feel predictable.
SUNNY 16 for F/8:
Sunny 16 says: in bright sun, shutter speed ≈ 1/ISO at f/16.
At ISO 100 that’s:
Sunny 16: f/16 at 1/100 s
To keep the same exposure at f/8, you’re opening up 2 stops (f/16 → f/11 → f/8), so you need to make the shutter 2 stops faster:
1/100 → 1/200 → 1/400 s
So the “Sunny f/8” equivalent at ISO 100 is:
f/8 at 1/400 s
In general:
Rule at f/8: use 1/(4 × ISO) as your shutter speed in full sun.
Resources:
Photography cheat sheet: camera metering modes | Digital Camera World
https://www.digitalcameraworld.com/tutorials/photography-cheat-sheet-at-a-glance-guide-to-metering-modes
Understanding Metering and Metering Modes
https://photographylife.com/understanding-metering-modes
Amazon.com : Sekonic LiteMaster Pro L-478D-U Light Meter, Touchscreen Incident & Reflected Meter with Flash Analyzing, Cine Frame Rate & Shutter Angle Control, Illuminance & Luminance Measurement : Electronics
https://www.amazon.com/Sekonic-LiteMaster-L-478D-U-Light-401-474/dp/B01ARGBWU8/ref=sr_1_4?crid=1UWSYV9H0XHHL&dib=eyJ2IjoiMSJ9.Kx7kCETtD5LhvCJ1UpphvG8BtF5dlqTzW7cI5h481D9Qqi64FbeG6cJcBcd1D6o4_vfT89t6GqDX9Epc7gt_u7ohvB0MBquhKOTlredhwW5ylnX–4TgcJRMZ3VFHL7SgOD27VXRuU-YtVvIglsBCb1zmytagXTbbN-AtrLzLhAytS8QzFLRkpMKH58FFlojBIW0ud3goeb7F5vIA39xszTaAoyyYMP2iURHgktPBYI.W0HFV0ioBl48p6PKkRgEogM2wF-I6ZNARU9N-M5eLgs&dib_tag=se&keywords=incident+light+meter+photography&qid=1779130483&sprefix=incident+meter%2Caps%2C685&sr=8-4
The Sunny 16 Rule in Photography | PetaPixel
https://petapixel.com/sunny-16-rule/
Equivalent Exposure Calculator, or Compare Any Two Camera Exposures
https://www.scantips.com/lights/exposurecalc.html?cb=0&bt=1&optn=2
Exposure Value (EV) Explained – Plus EV Charts
https://photographylife.com/exposure-value
Calibrite ColorChecker Passport Photo 2 CCPP2 B&H Photo Video
https://www.bhphotovideo.com/c/product/1649345-REG/calibrite_ccpp2_colorchecker_passport_photo_2.html/?ap=y&ap=y&smp=y&smp=y&store=420&smpm=ba_f2_lar&lsft=BI%3A6879&gad_source=1&gad_campaignid=13535675462&gbraid=0AAAAAD7yMh2VkYdGrvE8vEY_QgBDwRSw7&gclid=CjwKCAjw8arQBhB9EiwAfIKdQsvoIiTEV3GtQZnsgJMYV1CpsgSUKTFub0F49bd54_Uqlt03OzfdDhoCN58QAvD_BwE
Homework
- Shoot and send me some images. I don’t care what they are of, just that you are practicing.
- Send me Flickr links
- Work through some of the equivalent exposures table and see if you can come up with some of your own.
Class 5: Focal lengths, Field of View, a full kit and White Balance
Sorry in advance for the formatting – it was a struggle.
Overview: We looked at focal length, field of view, and when you would apply them. We also looked at a full kit, and then dove into White Balance.
Focal length and field of view are related concepts in photography, but they refer to different aspects of how a lens captures an image.**
I. Focal Length
Definition: The distance between the lens and the image sensor when the subject is in focus, measured in millimeters (mm).
Impact on Image:
- A short focal length (e.g., 24mm) captures a wider view, suitable for landscapes or architecture.
- A long focal length (e.g., 200mm) narrows the field of view and brings distant subjects closer, ideal for wildlife or sports photography.
Perspective: Affects how close or far subjects appear. Shorter focal lengths exaggerate distances between objects, while longer focal lengths compress distances.
II. Field of View
Definition: The extent of the observable world seen through the lens at any given moment, described in degrees.
Impact on Image:
- A wider field of view captures more of the scene.
- A narrower field of view focuses more closely on a specific area.
Relationship to Focal Length: Directly influenced by the focal length. A shorter focal length results in a wider field of view, while a longer focal length results in a narrower field of view.
III. Summary
- Focal Length: Describes the lens's magnification power and its effect on perspective.
- Field of View: Describes how much of the scene will be captured by the lens.
Think of focal length as the "zoom level" of your lens and field of view as how much of the scene fits into your frame.*
IV. Lenses and Focal Lengths
Prime vs. Zoom Lenses:
Prime lenses have a fixed focal length and are known for their sharpness and fast apertures.
Zoom lenses offer variable focal lengths, providing flexibility in framing shots without changing lenses.
Standard Lenses:
Typically 50mm on a full-frame camera.
Mimic the field of view of the human eye.
Versatile for various types of photography.
Wide-Angle Lenses:
Usually 35mm and below on a full-frame camera.
Great for landscapes, architecture, and capturing wide scenes.
Can cause distortion, making subjects appear farther apart.
Telephoto Lenses:
Typically 70mm and above.
Ideal for sports, wildlife, and portrait photography.
Allows capturing subjects from a distance while compressing the background.
Macro Lenses:
Designed for close-up photography.
Perfect for capturing intricate details of small subjects like insects and flowers.
The distinction between zoom lenses and telephoto lenses often confuses people, but it's actually quite straightforward:*
V. Zoom Lens
Definition: Has a variable focal length, allowing you to zoom in and out. The focal length range is expressed as a number range (e.g., 24-70mm, 70-200mm).
Flexibility: Offers great flexibility because it can cover multiple focal lengths, eliminating the need to switch lenses frequently.
Examples:
- Wide-angle zoom (e.g., 16-35mm) for landscapes.
- Standard zoom (e.g., 24-70mm) for general photography.
- Telephoto zoom (e.g., 70-200mm) for sports and wildlife.
VI. Telephoto Lens
Definition: Designed to magnify distant subjects, typically with a longer focal length. Can be either a fixed focal length (prime) or a zoom lens.
Purpose: Ideal for capturing subjects that are far away, such as wildlife, sports, or even portraits with a pleasing background blur.
Examples:
- Prime telephoto (e.g., 300mm, 500mm) for ultra-sharp images at specific distances.
- Telephoto zoom (e.g., 70-200mm) for versatility with magnification.
VII. Key Differences
- Zoom Lens: Refers to the capability of changing focal lengths. It can be wide-angle, standard, or telephoto.
- Telephoto Lens: Refers to the type of lens designed for magnifying distant subjects, which can also be a zoom lens or a prime lens.
So, essentially, all telephoto lenses can be part of the zoom or prime lens categories, but not all zoom lenses are telephoto lenses.
Common Focal Lengths by Genre
| Genre | Common Focal Lengths |
|---|---|
| Landscape | 12-35mm |
| Portrait | 85-135mm |
| Street | 24-35mm |
| Wildlife | 200-600mm |
| Sports | 70-200mm, 200-400mm |
VIII. Example Kit
A complete lens kit typically includes a variety of lenses that cover a broad range of focal lengths and purposes. Here's what a well-rounded lens kit might look like and what each lens would be used for:
Complete Lens Kit
- Wide-Angle Lens (e.g., 16-35mm or 10-24mm)
Uses:- Landscape photography: Capturing wide vistas and scenery.
- Architecture: Emphasizing the grandeur of buildings and interior spaces.
- Street photography: Including more context in your shots.
- Standard Zoom Lens (e.g., 24-70mm or 18-55mm)
Uses:- Everyday photography: Versatile for general use, including portraits, landscapes, and street photography.
- Event photography: Great for weddings, parties, and gatherings.
- Telephoto Zoom Lens (e.g., 70-200mm or 70-300mm)
Uses:- Sports and wildlife: Capturing distant subjects with clarity.
- Portraits: Creating flattering compression and beautiful background blur.
- Prime Lens (e.g., 50mm or 85mm)
Uses:- Portraits: Exceptional sharpness and bokeh for stunning portraits.
- Low-light photography: Wide apertures (e.g., f/1.8 or f/1.4) allow for great performance in dim conditions.
- Macro Lens (e.g., 100mm or 60mm)
Uses:- Close-up photography: Detailed shots of flowers, insects, and small objects.
- Product photography: Capturing fine details in small items.
- Ultra-Wide Angle Lens (e.g., 8-15mm)
Uses:- Creative photography: Unique perspectives and dramatic effects.
- Real estate photography: Showcasing entire rooms and large spaces.
- Super Telephoto Lens (e.g., 400mm or 600mm)
Uses:- Wildlife and bird photography: Capturing distant subjects in detail.
- Sports photography: Focusing on specific players or action from a distance.
Optional Additions
Tilt-Shift Lens:
Uses: Architecture and landscape photography for correcting perspective distortion.
Fisheye Lens:
Uses: Creative and artistic shots with an exaggerated, spherical effect.
Summary
Wide-Angle Lens: Landscapes, architecture.
Standard Zoom Lens: General use, events.
Telephoto Zoom Lens: Sports, wildlife, portraits.
Prime Lens: Portraits, low-light.
Macro Lens: Close-ups, products.
Ultra-Wide Angle Lens: Creative, real estate.
Super Telephoto Lens: Wildlife, sports.
Deciding Which Lens to Use
Deciding which lens to use can depend on various factors, including the type of photography you’re doing, the environment, and your creative vision. Here are some steps and considerations to help you make the best choice:
Steps to Decide Which Lens to Use
- Determine Your Subject
Portraits: Prime lenses with wide apertures (e.g., 50mm, 85mm) are great for beautiful background blur (bokeh).
Landscapes: Wide-angle lenses (e.g., 16-35mm) capture expansive views.
Sports/Wildlife: Telephoto lenses (e.g., 70-200mm, 200-600mm) let you shoot from a distance.
Macro: Macro lenses (e.g., 100mm) are perfect for close-up details.
Street Photography: Standard or wide-angle lenses (e.g., 24-70mm) are versatile for capturing candid moments. - Consider the Environment:
Indoor/Low Light: Lenses with large apertures (e.g., f/1.4, f/1.8) let in more light, making them ideal for indoor or low-light conditions.
Outdoor/Daylight: Almost any lens can work well, depending on the subject and composition.
Crowded Spaces: Wide-angle lenses can help you capture more of the scene without stepping back. - Think About Your Shooting Style:
Travel/Versatility: Zoom lenses (e.g., 24-105mm) offer flexibility without needing to switch lenses frequently.
Creative/Artistic: Specialty lenses like fisheye or tilt-shift can provide unique effects and perspectives. - Evaluate Practical Factors:
Weight and Size: Consider how heavy and bulky the lens is, especially if you’ll be carrying it for long periods.
Budget: Some lenses are more expensive due to their quality and capabilities, so consider your budget. - You keep the same perspective
- Background compression stays consistent
- Subject proportions stay natural
- You don’t distort faces or objects
- You maintain your shooting position (useful for consistency, composites, or tight spaces)
- This is why portrait photographers often stay put and zoom — it preserves the geometry of the face.
- You change the relationship between foreground and background
- Background spreads out or collapses depending on distance
- You can exaggerate or minimize depth
- You can create more dramatic wide‑angle effects
- This is why street photographers and environmental portrait shooters move a lot — they’re sculpting perspective.
Zooming vs. Moving
Zooming changes framing.
Moving changes perspective.
They are not interchangeable, and neither is “better.”
What you gain by zooming with the lens
What you gain by moving your feet
White balance
What is White Balance?
White Balance adjusts color tones to ensure your image looks natural, balancing warm (yellow/red) and cool (blue) tones.
Where to Find White Balance Settings:
Open the Develop Module (Shortcut: Press D on your keyboard).
Locate the White Balance panel at the top of the right-hand toolbar.
Setting White Balance:
Use the Temp slider for warm-to-cool adjustments.
Use the Tint slider for green-to-magenta adjustments.
For automatic adjustments, select a Preset from the drop-down menu (e.g., As Shot, Auto, Daylight, Cloudy).
Use the White Balance Selector Tool (eyedropper icon):
Click on a neutral gray or white area of your image.
Lightroom will automatically adjust the balance based on that selection.
Resources
Understanding Focal Length
https://www.nikonusa.com/learn-and-explore/c/tips-and-techniques/understanding-focal-length
dLtSzUFN8o9unJa5rRKBL7-970-80.jpg.webp (970×546)
https://cdn.mos.cms.futurecdn.net/dLtSzUFN8o9unJa5rRKBL7-970-80.jpg.webp
Lens Visualizer Tools – DT Photo
https://www.photo-digitaltransitions.com/support/lens-visualizer-tools/
What is a 35mm Lens Good For? | ComposeClick
https://composeclick.com/what-is-a-35mm-lens-good-for/
50mm Versus 85mm: Side-by-Side Lens Comparison for Portraits | Fstoppers
https://fstoppers.com/bts/50mm-versus-85mm-side-side-lens-comparison-portraits-627922
What is Lens Distortion?
https://photographylife.com/what-is-distortion
Is the Canon EF 70-200mm f/2.8L IS II USM Telephoto Zoom Lens the Best Wedding Photography Lens? – Hand and Arrow Photography
https://handandarrow.com/is-the-canon-ef-70-200mm-f28l-is-ii-usm-telephoto-zoom-lens-the-best-wedding-photography-lens/#:~:text=Playing%20with%20the%2070%2D200mm’s%20strengths&text=By%20being%20able%20to%20zoom,portraiture%2C%20wedding%20ceremonies%2C%20etc.
Best macro lenses for mirrorless – a close-up look | Amateur Photographer
https://amateurphotographer.com/buying-advice/best-macro-lenses-for-mirrorless-and-dslrs/
Great illustration of how focal length affects facial proportions in portraiture. : r/analog
https://www.reddit.com/r/analog/comments/g9wsm1/great_illustration_of_how_focal_length_affects/#lightbox
Wide angle lens: A beginner’s Guide | Adobe
https://www.adobe.com/creativecloud/photography/discover/wide-angle-lens.html
Why the 18-55mm Kit Lens is Actually Amazing (Not Trash)
https://www.upskillist.com/blog/the-underrated-18-55mm-kit-lens/#:~:text=At%2018mm%2C%20it%20is%20fairly,55mm%20works%20wonders%20for%20portraits.
What is an Ultra-telephoto Zoom Lens? Points to consider when choosing a lens and sample photographs | Impression | Special Contents | TAMRON Photo Site for photgraphic lenses
https://www.tamron.com/global/consumer/sp/impression/detail/article-what-is-ultra-telephoto-lense.html#:~:text=Using%20an%20Ultra%2Dtelephoto%20Zoom,motion%20tracking%20performance%20when%20shooting.
Use tilt shift for creative focus effects – Adobe
https://www.adobe.com/creativecloud/photography/technique/tilt-shift.html
What is White Balance in Photography?
https://photographylife.com/understanding-white-balance
Interactive Color Temperature Chart | Giggster
https://giggster.com/guide/color-temperature-chart/
Homework:
- Grab your camera and multiple photographs of the same scene (and with a good exposure) and change the white balance between each image.
- Look again at the Depth of Field Calculator and fill out the Focal Length for the focal lengths of your lenses and look at the depth of fields you get. Depth of Field Calculator
- Print and fill this out the best you can, and bring it to class next week so we can see what gaps or questions you have. We haven’t hit all of the information on this sheet, but we will, so just skip those parts. Camera andlens info sheet
Class 4: Shutter Speed, Drive Mode and Focus Modes
Overview
We discussed shutter speed and did a fun activity, learned about drive modes and focus modes (which are not the same as focal points!) and looked at some great images.
Shutter Speed
Definition
Shutter speed is how long the camera’s shutter stays open during an exposure.
It’s measured in seconds or fractions of a second.
How shutter speed affects exposure (brightness)
Shutter speed controls how much light reaches the sensor.
Faster shutter speed (shutter open for less time) → less light → darker image.
Slower shutter speed (shutter open longer) → more light → brighter image.
Changing shutter speed may require adjusting aperture and/or ISO to keep exposure balanced.
A suggested way to practice is using Shutter Priority mode to see how ISO and aperture shift in different lighting.
How shutter speed affects motion
Shutter speed controls how motion is rendered.
Fast shutter speeds freeze motion (useful for sports, active kids, fast action).
Slow shutter speeds show more motion blur because movement is recorded while the shutter is open.
Motion blur can be used intentionally for creative effects, but exposure may need rebalancing to avoid overexposure.
Stability and when to use a tripod
Slower shutter speeds increase the risk of blur from camera shake (hand movement).
Camera shake is different from intentional motion blur and is generally something to avoid.
Stabilization (tripod or similar support) is recommended at slower speeds, especially if hands are unsteady.
Drive Modes
Your camera may not have all of these. By using these, we are telling the camera how many photos to take at a time.
Single Shot Mode
When to Use: Ideal for most types of photography, including portraits, landscapes, and still life.
How It Works: The camera takes one photo each time you press the shutter button. This mode is great for controlled environments where you have time to compose your shot.Continuous Shooting Mode (Burst Mode)
When to Use: Perfect for action photography, such as sports, wildlife, or any fast-moving subjects.
How It Works: The camera takes multiple photos in quick succession as long as you hold down the shutter button. This increases your chances of capturing the perfect moment.Self-Timer Mode
When to Use: Useful for group shots, self-portraits, or long exposures where you want to avoid camera shake.
How It Works: The camera delays the shutter release for a few seconds after you press the button, giving you time to get into position.Remote Release Mode
When to Use: Ideal for situations where you need to avoid touching the camera, such as long exposures, macro photography, or wildlife photography.
How It Works: You use a remote control to trigger the shutter, minimizing the risk of camera shake.Mirror Lock-Up Mode
When to Use: Best for long exposures or macro photography where even the slightest vibration can affect image sharpness.
How It Works: The camera locks the mirror in the up position before taking the shot, reducing internal vibrations.Quiet Mode (Silent Shutter Mode)
When to Use: Useful in quiet environments like weddings, wildlife photography, or any situation where you need to minimize noise.
How It Works: The camera reduces the noise made by the shutter and mirror mechanisms.Auto-Exposure Bracketing (AEB)
When to Use: Ideal for high-contrast scenes or HDR photography.
How It Works: The camera takes multiple shots at different exposure levels (e.g., one underexposed, one correctly exposed, and one overexposed) to capture a wider dynamic range.
Tips for Using Drive Modes:
Action Shots: Use Continuous Shooting Mode to capture fast-moving subjects.
Group Photos: Use Self-Timer Mode to ensure everyone, including the photographer, is in the shot.
Long Exposures: Use Remote Release or Mirror Lock-Up Mode to avoid camera shake.
Quiet Environments: Use Quiet Mode to minimize shutter noise.
Camera Focus Modes
Camera focus modes are different settings that allow photographers to adapt to various shooting situations. They help you acquire focus on your subjects effectively, which is essential for creating appealing photographs. The right focus mode can make the difference between a sharp, professional-looking image and a missed shot.
Main Focus Modes
AF-S (Auto Focus Single Shot)
How it works: The camera takes control of focus when you half-press the shutter button
Behavior: Locks focus once acquired and prevents you from taking a photo until focus is confirmed
Best for: Static subjects like landscapes and portraits
Key feature: Can use AE-Lock/AF-Lock button for "focus and recompose" technique
AF-C (Auto Focus Continuous)
How it works: Autofocus remains active as long as the shutter button is half-pressed
Behavior: Continuously tracks moving subjects and allows you to shoot at any moment
Best for: Moving subjects like wildlife, sports, and action photography
Advantage: More versatile than AF-S for dynamic situations
AF-A (Auto Focus Automatic)
How it works: Camera intelligently switches between AF-S and AF-C based on subject movement
Behavior: Automatically detects if subject is moving or stationary
Best for: Unpredictable shooting conditions
Note: Often the default mode on modern mirrorless cameras
Manual Focus Mode
How it works: You control focus entirely using the lens focus ring
Advantages: Complete control, silent operation, works well in low light
Best for: Situations requiring precise control, low light, or when autofocus struggles
Learning curve: More challenging but offers ultimate precision
Resources
Shutter Speed Photography – Shutter Speed Chart
https://www.photographer.org/shutter-speed/
Shutter-Speed-Chart-Scale.jpg (811×344)
https://www.photographer.org/wp-content/uploads/2018/07/Shutter-Speed-Chart-Scale.jpg
shutter-speed-exposure.jpg (395×746)
https://www.photographer.org/wp-content/uploads/2018/07/shutter-speed-exposure.jpg
shutter-speed-chart.jpg (750×662)
https://www.photographer.org/wp-content/uploads/2018/07/shutter-speed-chart.jpg
shutter-speed-chart-2.jpg (810×1000)
https://www.photographer.org/wp-content/uploads/2018/07/shutter-speed-chart-2.jpg
What Are Drive Modes on Your Camera and How to Use Them? – Digital Photo Mentor
https://www.digitalphotomentor.com/camera-drive-modes/
Focus Modes Explained – Understanding Camera Autofocus Modes
https://capturetheatlas.com/focus-modes/
Dynamic Motion Blur Scene Of A Highspeed Monorail In Tokyo At Night Stock Photo – Download Image Now – iStock
https://www.istockphoto.com/photo/dynamic-motion-blur-scene-of-a-high-speed-monorail-in-tokyo-at-night-gm2225367026-641410955?utm_source=flickr&utm_medium=affiliate&utm_campaign=srp_photos_top&utm_term=lightpainting&utm_content=https%3A%2F%2Fwww.flickr.com%2Fsearch%2F&ref=sponsored
What is Back Button Focus and Why You Should be Using It
https://photographylife.com/back-button-focus
‘Help! My Photos Are Not Sharp.’ How Can You Avoid Blurry Images? | Fstoppers
https://fstoppers.com/education/help-my-photos-are-not-sharp-how-can-avoid-blurry-images-650414
Search: chicago night city scape | Flickr
https://www.flickr.com/search/?text=chicago+night+city+scape
The first picture of a human being taken in Paris in 1838 | Un jour de plus à Paris
https://www.unjourdeplusaparis.com/en/paris-insolite/premiere-photo-etre-humain-paris-en-1838
Homework
- Figure out your minimum handheld shutter speed by starting with TV or Shutter speed priority and a stationary object and keep lowering your shutter speed and taking photos until the object is blurry from camera shake. The shutter speed above that is your minimum handheld shutter speed.
- Fan exercise:
Turn on all the lights in your room for maximum brightness. Set your camera to manual mode with these starting settings: ISO 100, aperture f/5.6.
Start with a slow shutter speed like 1/30 second and take a photo of your ceiling or table fan running. The blades will be completely blurred. Now gradually increase your shutter speed – try 1/60, then 1/125, 1/250, 1/500, and keep going faster until the fan blades appear sharp and frozen in your photo.
As you increase shutter speed, your photos will get darker. When this happens, increase your ISO to maintain a good exposure. You’ll likely need to go up to ISO 800, 1600, or even higher to keep your photos properly exposed at the fastest shutter speeds. If you have larger apertures available to you (like f/4 or f/2.8), you can use them, too.
This exercise teaches you exactly how shutter speed controls motion blur and shows you the relationship between shutter speed, ISO, and exposure.
- Exposure Exercise:
Capture the same scene three ways:
- A good exposure
- One stop underexposed
- One stop overexposed
The key is to change one setting at a time (ISO, shutter speed, or aperture) so it’s clear what each setting does.
Setup
- Sit in one spot and choose a scene that won’t change much for a few minutes (no fast-moving subjects).
- Keep the camera pointed at the same composition for the whole exercise.
- Turn off flash.
- Shoot in Manual (M) mode.
- If possible, shoot RAW (JPEG is fine if RAW isn’t available).
Step 1: Make a “good exposure” (your baseline)
- Set a starting ISO (pick something reasonable for the light, like ISO 100–400 outside or ISO 400–1600 inside).
- Choose an aperture and shutter speed that make sense for the scene.
- Take a test photo.
- Use your meter (the exposure scale in the viewfinder/back screen) and/or the histogram to adjust until the exposure looks good.
- Take the baseline photo and label it (in your notes or by memory): Baseline (0).
Step 2: Underexpose by one stop (−1) — change ONE variable
Take three separate “−1 stop” photos, each created a different way. After each photo, return to the baseline settings before trying the next method.
Method A: ISO only
- From the baseline, change ISO down by 1 stop.
- Example: 400 → 200, or 800 → 400
- Keep shutter speed and aperture the same.
- Take the photo. (This should be −1.)
Method B: Shutter speed only
- Return to the baseline.
- Change shutter speed faster by 1 stop.
- Example: 1/125 → 1/250, or 1/60 → 1/125
- Keep ISO and aperture the same.
- Take the photo. (This should be −1.)
Method C: Aperture only
- Return to the baseline.
- Change aperture smaller by 1 stop (a higher f-number).
- Example: f/4 → f/5.6, or f/5.6 → f/8
- Keep ISO and shutter speed the same.
- Take the photo. (This should be −1.)
Step 3: Overexpose by one stop (+1) — change ONE variable
Take three separate “+1 stop” photos, each created a different way. After each photo, return to the baseline settings before trying the next method.
Method A: ISO only
- From the baseline, change ISO up by 1 stop.
- Example: 200 → 400, or 400 → 800
- Keep shutter speed and aperture the same.
- Take the photo. (This should be +1.)
Method B: Shutter speed only
- Return to the baseline.
- Change shutter speed slower by 1 stop.
- Example: 1/250 → 1/125, or 1/125 → 1/60
- Keep ISO and aperture the same.
- Take the photo. (This should be +1.)
Method C: Aperture only
- Return to the baseline.
- Change aperture wider by 1 stop (a lower f-number).
- Example: f/8 → f/5.6, or f/5.6 → f/4
- Keep ISO and shutter speed the same.
- Take the photo. (This should be +1.)
What to notice (quick reflection)
After you’ve taken all the photos, compare them side-by-side.
- Which method changed the look of the photo the most (depth of field, motion blur, noise)?
- Which method changed the exposure without changing the look much?
- Which setting would you choose first in this lighting situation, and why?
Optional: A simple tracking table
| Photo | ISO | Shutter Speed | Aperture | Target |
|---|---|---|---|---|
| Baseline | 0 | |||
| ISO −1 | −1 | |||
| Shutter −1 | −1 | |||
| Aperture −1 | −1 | |||
| ISO +1 | +1 | |||
| Shutter +1 | +1 | |||
| Aperture +1 | +1 |
Class 3 - Aperture and Depth of Field
Overview: We briefly reviewed the exposure triangle, the concept of ‘stops’s, and dove into aperture and depth of field.
Aperture and Depth of Field
- Depth of Field Definition
- The zone from the nearest to the farthest point in your scene that remains in focus. Imagine you’re taking a portrait: DoF determines whether just the subject’s eyes are sharp or if their entire face is in focus, along with the background.
- Key Points about Depth of Field
- Acceptably Sharp: The term “acceptably sharp” is subjective. It depends on factors like how you’ll view the image (print, screen, etc.) and your vision.
- Factors Influencing DoF
- Aperture: The size of the lens opening (measured in f-stops) significantly affects DoF. Larger apertures (smaller f-stop numbers) create a shallow DoF, where only a small slice of the image is in focus. Smaller apertures (higher f-stop numbers) result in a deeper DoF, where more of the scene is sharp.
- Camera-Subject Distance: The closer you are to your subject, the shallower the DoF. Conversely, greater distance increases the depth of field.
- Focal Length: Longer lenses (higher focal lengths) tend to have shallower DoF, while wider lenses (shorter focal lengths) provide more depth.
- Sensor Size: Larger sensors (commonly found in full-frame cameras) generally yield shallower DoF compared to smaller sensors (like those in crop-sensor cameras).
- Visualizing DoF
- Imagine a narrow DoF as a photo where only a small slice is in focus (like a blurred background behind a subject).
- Conversely, a large DoF means much more of the scene is sharp (think landscapes where both foreground flowers and distant mountains are clear).
Practical Tips
- Portraits: For creamy backgrounds and subject isolation, use wider apertures (e.g., f/1.8 or f/2.8).
Landscapes: Smaller apertures (e.g., f/8 or f/11) help keep everything sharp from foreground to background.
Experiment: Play with different settings to see how DoF changes. It’s a creative tool!
Focus Points: Telling the camera what you want it to focus on.
- Single-Point AF
- Description: This mode allows you to select a single focus point manually. The camera will focus on the subject located at that specific point.
- When to Use: Ideal for precise focusing, such as in portrait photography where you want to focus on the subject’s eyes. It’s also useful for still subjects and when you need to control exactly where the focus should be.
- Dynamic Area AF
- Description: You select a single focus point, but the camera also considers surrounding points to maintain focus if the subject moves slightly.
- When to Use: Great for photographing moving subjects, such as children playing or animals in motion. It provides a balance between precision and flexibility.
- Zone AF
- Description: The camera divides the frame into zones, and you can select a zone where the camera will focus. It uses multiple focus points within that zone.
- When to Use: Useful for subjects that move within a specific area of the frame, such as sports photography or events where the action is concentrated in one part of the scene.
- Auto-Area AF
- Description: The camera automatically selects the focus points based on the subject’s position and movement. It often uses advanced algorithms to detect faces or subjects.
- When to Use: Best for quick snapshots or when you need to capture a moment without having time to manually select focus points. It’s convenient for casual photography and situations where the subject is unpredictable.
- Group-Area AF
- Description: This mode uses a cluster of focus points to track a subject. It’s more focused than Zone AF but covers a larger area than Single-Point AF.
- When to Use: Ideal for tracking larger subjects or groups of people. It’s useful in wildlife photography where the subject might move unpredictably.
Summary of When to Use Each Focus Point Option (remember to keep depth of field in mind)
- Single-Point AF: Portraits, still subjects, precise focusing.
- Dynamic Area AF: Moving subjects, children, pets.
- Zone AF: Sports, events, concentrated action.
- Auto-Area AF: Quick snapshots, casual photography, unpredictable subjects.
- Group-Area AF: Wildlife, groups of people, larger subjects.
Tips for Using Focus Points
- Focus and Recompose: For static subjects, you can use the focus and recompose technique. Focus on your subject using a single point, then recompose your shot while keeping the focus locked. This is harder to do than you think so use with caution.
- Back-Button Focus: Consider using back-button focus to separate focusing from the shutter release. This can give you more control, especially in dynamic shooting situations. See more in the Resources section
- Make subject speed changes in Focus Menu
- If camera won’t focus, step back a step (you maybe too close)
Resources
Exposure Stops in Photography – A Beginner’s Guide
https://photographylife.com/what-are-exposure-stops-in-photography
Depth of Field (DoF) calculator | PhotoPills
https://www.photopills.com/calculators/dof#embed
Exposure Simulator
http://www.andersenimages.com/tutorials/exposure-simulator/
bokeh – Google Search
https://www.google.com/search?q=bokeh&sca_esv=9eff12e450c8c5f1&rlz=1C1CHZN_enUS1119US1119&udm=2&biw=1344&bih=706&sxsrf=AE3TifNk4hucsWeK3SR413Z89RcRAzfYqA%3A1759416435030&ei=c5DeaITAAfvIp84PhePpgAs&ved=0ahUKEwjExfz84IWQAxV75MkDHYVxGrAQ4dUDCBE&uact=5&oq=bokeh&gs_lp=Egtnd3Mtd2l6LWltZyIFYm9rZWgyCBAAGIAEGLEDMggQABiABBixAzIIEAAYgAQYsQMyCBAAGIAEGLEDMgUQABiABDIFEAAYgAQyBRAAGIAEMgUQABiABDIFEAAYgAQyCxAAGIAEGLEDGIMBSMoWUJAFWMAScAF4AJABAJgBUKABlwGqAQEyuAEDyAEA-AEBmAIDoAKiAcICBhAAGAcYHsICBxAjGCcYyQLCAgoQABiABBhDGIoFmAMAiAYBkgcBM6AHzAqyBwEyuAeeAcIHBTAuMi4xyAcH&sclient=gws-wiz-img
DIY – Create Your Own Bokeh
https://www.diyphotography.net/diy_create_your_own_bokeh/
Camera Focus Points Explained – PhotoWorkout
https://www.photoworkout.com/camera-focus-points/
Focus Modes Explained – Understanding Camera Autofocus Modes
https://capturetheatlas.com/focus-modes/
Focus Modes: When and How to Use Them
https://greatbigphotographyworld.com/focus-modes/
What is Back Button Focus and Why You Should be Using It
https://photographylife.com/back-button-focus
Homework
- Try out the exposure simulators with different settings and try to predict what will happen!
- Try the aperture experiment at home:
- start with 1/100 or 1/125 shutter speed, ISO 400, and aperture of f/5.6
- place 2 objects on the same surface, about a foot apart and offset from each other
- work on getting the exposure correct for the nearest object by focusing on it and using the above settings, then increasing your depth of field by increasing your aperture number (aperture number gets bigger) to try to get the second item in acceptable focus through depth of field while still physically focusing on the nearer object.
- Continue to adjust your settings until you have a good exposure and enough depth of field for both objects to be in focus.
- Shoot photos! Use your photo bingo card and see what you get. Optional: Send me 2-3 images for gentle critique and editing
- Send me 3-5 Flickr finds to share with the class
Class 2 - Exposure Triangle Overview
Overview: We looked at the Exposure Triangle and how the variables relate to each other.
In photography, “good exposure” refers to an image that has the optimal balance of light and dark areas, ensuring that details are visible in both the highlights (bright areas) and the shadows (dark areas). A good exposure means that the image accurately represents the scene as intended by the photographer, without being too bright (overexposed) or too dark (underexposed). Cameras measure the scene and want its settings to equal 18% grey (the midpoint between darkest shadows and lightest highlights).
We increase or decrease our exposure in ‘stops’. ‘Stops’ are relative to your initial exposure.
Key Elements of a Good Exposure
Detail in Highlights and Shadows:
The brightest parts of the image (highlights) retain detail without appearing “blown out” or pure white, like the bird photo we looked at in class.
The darkest parts of the image (shadows) retain detail without appearing completely black.
It’s easier to bring back detail in the blacks and shadows than in blown highlights.
Correct Overall Brightness:
The image is not too dark (underexposed) or too bright (overexposed). The mid-tones are well-balanced.
Proper Contrast:
There is an appropriate range of tones from dark to light, providing depth and dimension to the image.
Color Accuracy:
Colors appear natural and true to life, unless a specific artistic effect is intended.
Intentional Exposure:
The exposure matches the photographer’s creative vision and intent, whether it’s aiming for a realistic representation or a specific mood or effect.
Shutter Speed:
Controls the duration of light hitting the camera sensor. Faster shutter speeds let in less light, while slower shutter speeds let in more light.
Aperture:
The size of the lens opening that allows light to enter. Larger apertures (smaller f-numbers) let in more light, while smaller apertures (larger f-numbers) let in less light. Aperture and focal distance control depth of field. More later.
ISO:
The sensitivity of the camera sensor to light. Lower ISO values require more light but produce less noise, while higher ISO values are more sensitive to light but can introduce noise.
Lighting Conditions:
Natural and artificial light sources, their intensity, direction, and quality affect the exposure.
Reflectivity of the Scene:
The brightness and colors of the subjects and backgrounds in the scene can impact the overall exposure. (e.g., Snow vs dusk)
Achieving Good Exposure:
Finding the right balance between these factors to capture an image that is visually pleasing and meets the photographer’s goals, which is subjective!
ISO:
Doesn’t always have exposure compensation so may have to change manually.
Resources:
Exposure Stops in Photography – A Beginner’s Guide
https://photographylife.com/what-are-exposure-stops-in-photography
blown-away-white-subject.jpg (720×514)
https://www.better-digital-photo-tips.com/images/blown-away-white-subject.jpg
Screen-Shot-2016-01-12-at-3.06.26-PM.png (780×529)
https://www.kimhildebrand.com/wp-content/uploads/2016/06/Screen-Shot-2016-01-12-at-3.06.26-PM.png
Exposure_triangle_cheat_sheet
file:///C:/Users/heath/Downloads/Exposure+Triangle.pdf
dc5a6607-dc48-4b13-9e14-9c34136585b3_Untitled+design+(48).png (2428×972)
https://images.prismic.io/pixop-web/dc5a6607-dc48-4b13-9e14-9c34136585b3_Untitled+design+%2848%29.png?auto=compress,format
photography-shutter-speed-aperture-iso-cheat-sheet-chart-fotoblog-hamburg-daniel-peters-11-800×393.jpg (800×393)
https://cloudfront.slrlounge.com/wp-content/uploads/2015/04/photography-shutter-speed-aperture-iso-cheat-sheet-chart-fotoblog-hamburg-daniel-peters-11-800×393.jpg
Essential Photography basics – Google Slides
https://docs.google.com/presentation/d/1OMK2khLCSck2UgQEdCY8P0PPTO4ATysEk391F68ny-Q/preview?slide=id.g3b7c87081a_0_259
Histogram
file:///C:/Users/heath/OneDrive/Desktop/Histogram.pdf
What are Blinkies in Photography, and Do They Really Matter? | PetaPixel
https://petapixel.com/what-are-blinkies-in-photography/
Equivalent Exposure Calculator, or Compare Any Two Camera Exposures
https://www.scantips.com/lights/exposurecalc.html
The Web’s Original CameraSim
https://www.camerasim.com/original-camerasim
Why does the sky often come out white in my photos? | Discover Digital Photography
https://www.discoverdigitalphotography.com/2015/why-does-the-sky-often-come-out-white-in-my-photos/
Understanding the Histogram | Photzy
https://photzy.com/understanding-the-histogram/
Why does the sky often come out white in my photos? | Discover Digital Photography
https://www.discoverdigitalphotography.com/2015/why-does-the-sky-often-come-out-white-in-my-photos/
Homework:
- Google how to turn on the ‘blinkies’ on your camera’s playback.
- Keep looking for Flickr images and send me 3 Flickr URLs.
- Play with the Exposure Simulator and try to anticipate what will happen when you make changes.
Class 1: Introduction and Camera Overview
Overview: We got our toes wet by making our introductions, had some technical difficulty, and identified parts of our cameras. We figured out how to change our aperture, shutter speed and ISO, plus our focal point. We also looked at images on Flickr and talked about different settings.


Resources: This will usually have some further reading.
Homework:
- Get familiar with changing your shutter speed, ISO and aperture by picking a row below and changing your settings to match it. Keep changing your settings so it starts to become second nature 🙂
ISO Aperture (f-stop) Shutter Speed (seconds) 100 f/2.8 1/1000 200 f/4 1/500 400 f/5.6 1/250 800 f/8 1/125 1600 f/11 1/60 3200 f/16 1/30 6400 f/22 1/15 12800 f/2.8 1/8000 25600 f/4 1/4000 51200 f/5.6 1/2000 1/2 and 1/3 stops
ISO Aperture (f-stop) Shutter Speed (seconds) 100 f/2.8 1/1000 125 f/4 1/800 160 f/5.6 1/640 200 f/8 1/500 250 f/11 1/400 320 f/16 1/320 400 f/22 1/250 500 f/2.8 1/2000 640 f/4 1/1600 800 f/5.6 1/1250 - Go to Flickr.com and make a login. You don’t have to give them any money, this is a free service for our purposes! Then, find 3 images you like and can talk about and send me the URLs (just copy and paste the url in an email to me at sourwood.photography@gmail.com). We are trying to develop your eye and style.
Reach out if you have any questions!!
